
The Secret to Perfect Mini Cup Desserts: Cookies & Cream Edition
Mini cup desserts have become the star attraction at my dessert table, with cookies and cream varieties standing out as the most popular recipe on my blog. These delightful bite-sized treats combine the perfect balance of creamy filling and crunchy Oreo cookies in an irresistible individual serving.
I’ve developed several cookies and cream dessert cups that are not only adorable but also incredibly versatile. From no-bake cheesecake versions that stay fresh for up to 5 days in the refrigerator to moist chocolate cupcakes topped with cookies and cream buttercream, there’s something for every Oreo lover. Additionally, these convenient desserts can be prepared in advance and stored for 2-3 days, making them perfect for parties or special occasions.
In this guide, I’ll share my secrets for creating perfect mini cup desserts featuring that beloved cookies and cream flavor. We’ll explore ingredient choices, step-by-step instructions, and creative variations that will have your guests reaching for seconds.
Choosing the Right Ingredients for Cookies and Cream Cups
The foundation of spectacular cookies and cream dessert cups begins with selecting quality ingredients. First of all, let’s explore what makes each component special and how your choices affect the final result.
Oreo cookies: classic or double-stuffed?
When creating oreo dessert cups, the cookie choice creates your foundation. Classic Oreos provide the perfect balance between chocolate cookie and cream filling, making them ideal for crushing into a consistent base. Moreover, they deliver that quintessential flavor with just enough sweetness. Though Double Stuf Oreos contain twice the filling and are certainly popular, they can sometimes create an overly sweet base. Furthermore, some recipes specifically caution against using Double Stuf cookies as “they will have too much stuffing”. For the most balanced chocolate-to-cream ratio in your mini cup desserts, standard Oreos typically work best.
Cream cheese vs. whipped topping
The creamy layer of cookies and cream dessert cups often features a combination of cream cheese and whipped topping. Room temperature cream cheese is essential for achieving a smooth, lump-free filling. Full-fat cream cheese produces the richest results, however, reduced-fat versions can work in a pinch, though they may alter the texture slightly. As for whipped topping, store-bought Cool Whip offers convenience and stability, especially important if your desserts will be served outdoors or stored for several days. Nevertheless, homemade whipped cream made from heavy cream provides a fresher, more authentic taste if serving immediately.
Why heavy cream matters
Heavy cream, with its fat content of 36-40%, brings unmatched richness to your mini cup desserts. This high-fat ingredient creates a luxurious mouthfeel and helps achieve that perfect fluffy, creamy texture in your filling. In addition, it whips beautifully into soft peaks, giving your dessert cups their characteristic lightness. The slight sweetness of heavy cream naturally enhances your dessert without adding extra sugar.
Optional add-ins for texture and flavor
Personalizing your cookies and cream dessert cups is where creativity shines. Try incorporating different Oreo flavors like mint, golden, or birthday cake for unique variations. Consequently, you might drizzle caramel or chocolate sauce between layers for added decadence. Mini Oreos make perfect decorative toppers, while extra cookie crumbs add delightful texture contrast. For special occasions, seasonal Oreo varieties can create themed desserts that surprise and delight guests.
Step-by-Step: How to Make Mini Cup Desserts
Creating delicious mini cup desserts is straightforward once you understand the basic techniques. Let me walk you through making these impressive treats step by step.
1. Crush and mix the cookie base
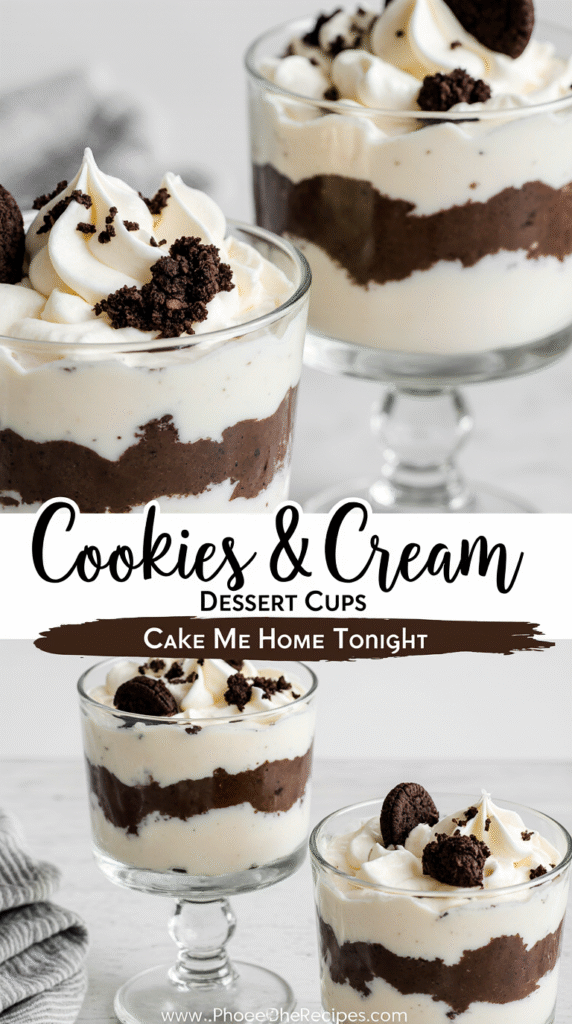
Initially, place about 18-22 Oreo cookies (with filling intact) in a food processor and pulse until you achieve fine crumbs. Alternatively, put the cookies in a ziplock bag and crush them using a rolling pin or mallet. For perfect cookie cups, fine crumbs hold together better than chunky pieces. Next, transfer the crushed Oreos to a bowl and add 4-5 tablespoons of melted butter. Stir thoroughly until the mixture resembles wet sand and holds together when pressed. Distribute about 1½-2 tablespoons of this mixture into each mini cup and press firmly using the bottom of a measuring cup or spoon to create a compact base.
2. Whip the cream cheese filling
Start with softened cream cheese (left at room temperature for at least 30 minutes) and beat until completely smooth. This prevents unwanted lumps in your finished desserts. Gradually incorporate powdered sugar (about ½ cup) and mix until fully combined. Once smooth, add vanilla extract for flavor. Some recipes call for folding in whipped topping (like Cool Whip) or heavy cream at this stage to create a lighter, fluffier texture. For a cookies and cream variation, fold in additional crushed Oreo pieces to distribute throughout the filling.
3. Layering the dessert cups
Following the base preparation, spoon or pipe the cream cheese mixture over the cookie crust, filling each cup about ¾ full. For cleaner presentation, use a piping bag with a star tip or simply snip the corner off a ziplock bag. Piping creates more precise layers and a professional appearance. Press gently to eliminate air pockets that might cause uneven layers.
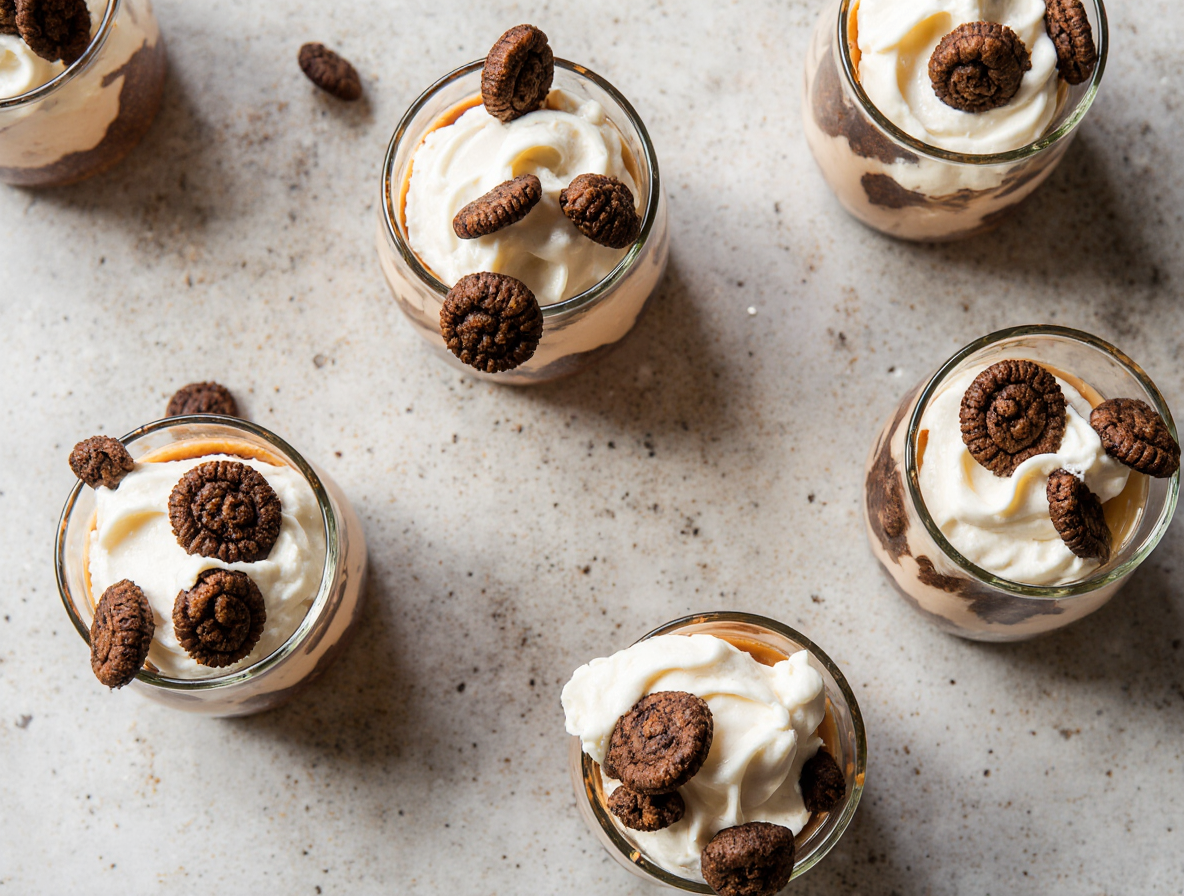
4. Topping with mini Oreos or crumbs
Enhance the visual appeal of your mini cup desserts with thoughtful toppings. Place a mini Oreo cookie on top of each cup for an elegant finish. Alternatively, sprinkle additional crushed Oreo crumbs over the surface. For special occasions, consider adding chocolate drizzle or a small dollop of whipped cream before the cookie garnish.
5. Chill and serve
Prior to serving, refrigerate the completed dessert cups for at least 1-2 hours to allow them to set properly. This chilling time helps flavors meld together and ensures the desserts hold their shape when served. These treats can be made up to 2-3 days ahead and stored covered in the refrigerator, making them perfect for party preparation.
Tips to Perfect Your Oreo Dessert Cups
After mastering the basic preparation, these expert tips will elevate your oreo dessert cups from good to extraordinary.
Use piping bags for clean layers
Piping bags create professional-looking desserts with precise, clean layers. For best results, fold over the top third of the bag while filling to keep the edges clean. First, place your filled bag inside a tall glass with the top folded over the rim for stability—particularly helpful when working with runny fillings like ganache or caramel. Remember to fill the bag only halfway to maintain control. For mini cup desserts, use 12-inch bags for detailed work or 16-inch bags when frosting multiple cups. After filling, twist the top securely and “burp” the bag by gently squeezing toward the tip to release air bubbles.
How to avoid soggy crusts
Nobody enjoys a soggy crust! To maintain crispness in your oreo dessert cups, crush cookies to a fine, consistent texture. Ideally, use a food processor for uniform crumbs, although a rolling pin and ziplock bag work well too. For added protection against moisture, try sprinkling a teaspoon of extra cookie crumbs over your base before adding the filling—they’ll absorb excess moisture as the dessert sets. Additionally, line up your plastic cups on a tray or cookie sheet before filling for easier handling between refrigerator trips.
Best cup sizes for serving
The 2-ounce plastic dessert cup offers perfect individual portions that satisfy sweet cravings without overwhelming. These smaller cups are ideal for parties and gatherings where guests sample multiple treats. Alternatively, consider cupcake liners as an eco-friendly option if you prefer to avoid disposable plastic.
Make-ahead and freezing tips
Mini cup desserts truly shine as make-ahead treats! Once prepared, they keep in the refrigerator for 2-3 days when covered properly. For longer storage, these desserts freeze beautifully—up to one month when well-wrapped. To serve frozen cups, thaw at room temperature for 30-60 minutes. When serving at outdoor events, consider keeping them in a cooler, as they can safely remain at room temperature for about 1-2 hours.
Creative Variations and Serving Ideas
Once you’ve mastered the basic cookies and cream cup recipe, it’s time to get creative with these mini desserts! Let’s explore exciting ways to customize your treats beyond the standard version.
Add caramel or chocolate drizzle
Elevate your oreo dessert cups with a generous drizzle of caramel or melted chocolate. Even a simple jarred caramel sauce works beautifully when drizzled between layers or over the top. For chocolate lovers, melt semi-sweet chocolate chips in the microwave and drizzle with a spoon or place in a small ziplock bag with the corner snipped off for precision. Given that many dessert enthusiasts are “completely obsessed with caramel,” this addition creates an irresistible sweet-salty contrast. Another option is creating caramel clusters by spooning melted caramels over mini Oreo cookies arranged in small groups of three.
Turn them into frozen treats
Mini cup desserts transform into refreshing frozen delights with minimal effort. Simply scoop 1/4 cup of cookies and cream ice cream into each well of a muffin tin, press an Oreo vertically into the softened ice cream, then freeze until firm (about 2-3 hours). Meanwhile, these frozen treats can be stored in airtight containers for up to a week, making them perfect for summer gatherings. The creme-flavored frozen dairy dessert packed with Oreo cookie pieces delivers that iconic taste in every bite.
Use different cookie flavors
Experiment with various Oreo flavors to create unique variations. Mint Oreos paired with a few drops of peppermint extract create a refreshing mint chocolate dessert cup. As well as this, chocolate creme Oreos, birthday cake Oreos, and red velvet Oreos work wonderfully with the cream cheese mixture. First thing to remember is that gluten-free Oreo cookies can easily substitute regular ones, making these treats accessible to more guests.
Mini cup dessert bar for parties
A mini cup dessert bar offers guests exciting options at any gathering. Display your treats in clear glass cups or plastic tumblers to showcase the beautiful layers. Above all, these individual portions are ideal for dessert buffets, picnics, holiday spreads, or birthday parties. To appeal to different preferences, offer kid-friendly versions with colorful sprinkles alongside more sophisticated adult variations featuring crushed nuts. Furthermore, these portable, pre-portioned desserts store beautifully and make excellent take-home treats for friends and family.
Conclusion
Mini cookies and cream dessert cups truly represent the perfect balance of convenience and indulgence. Throughout this guide, we’ve explored how these bite-sized treats can elevate any dessert table with minimal effort. The combination of crunchy Oreo base and creamy filling creates a texture contrast that guests find irresistible.
Classic Oreos work best for that quintessential cookies and cream flavor, though experimenting with different varieties adds exciting twists to your creations. Quality ingredients like room-temperature cream cheese and heavy cream make all the difference in achieving that luxurious mouthfeel everyone loves.
Preparation techniques matter significantly. Fine cookie crumbs pressed firmly create stable bases, while piping bags ensure professional-looking layers. Your desserts will stay fresh for days when properly stored, making them perfect for advance preparation before parties or gatherings.
Beyond the basic recipe, countless possibilities await. You might drizzle caramel for sweet-salty contrast or transform them into frozen treats for summer events. Different Oreo flavors open doors to seasonal variations that surprise and delight guests year-round.
These individual portions solve many dessert dilemmas at once – they’re portable, pre-portioned, and visually stunning when displayed. Most importantly, they consistently earn rave reviews from family and friends.
The beauty of mini dessert cups lies in their adaptability. They work equally well for casual family gatherings or elegant dinner parties. Once you master the basic technique, your creativity becomes the only limit to what you can create.
My guests always reach for seconds of these little treats – yours will too! Start with this basic cookies and cream recipe, then let your imagination run wild with variations that reflect your personal taste. Your dessert table will never be the same again.
FAQs
Q1. How long can I store mini cookies and cream dessert cups? These dessert cups can be stored in the refrigerator for 2-3 days when properly covered. For longer storage, they can be frozen for up to one month if well-wrapped.
Q2. What’s the best type of Oreo cookie to use for the base? Classic Oreos are typically the best choice for the base. They provide the perfect balance between chocolate cookie and cream filling, creating a consistent and not overly sweet foundation for the dessert.
Q3. Can I make these desserts ahead of time for a party? Absolutely! These mini dessert cups are perfect for making ahead. You can prepare them 1-2 days in advance and store them covered in the refrigerator, making them ideal for party preparation.
Q4. How can I prevent the cookie crust from getting soggy? To maintain crispness, crush the cookies to a fine, consistent texture. You can also sprinkle a teaspoon of extra cookie crumbs over your base before adding the filling to absorb excess moisture as the dessert sets.
Q5. What are some creative variations I can try with these dessert cups? You can experiment with different Oreo flavors like mint or birthday cake, add a caramel or chocolate drizzle, turn them into frozen treats, or create a dessert bar with various toppings for guests to customize their cups.