
The Foolproof No-Bake Orange Creamsicle Cheesecake (Tested 50+ Times)
Orange creamsicle cheesecake brings back those nostalgic summer days of childhood with every refreshing bite. This bright and zesty dessert combines cool, creamy vanilla with vibrant citrus flavors that create an irresistible treat for any occasion.
No-bake orange creamsicle cheesecake is actually one of my favorite desserts to prepare, particularly because it’s relatively easy yet totally impressive when serving to guests or for holiday meals. If you’re a fan of the classic frozen creamsicle treats, then you’ll certainly love this delightful dessert. What makes this recipe especially appealing is that it’s a no-bake dream that requires minimal effort but delivers maximum flavor. Moreover, it’s best to prepare this cheesecake the day before serving, as it needs at least 4 hours to set properly, though 6-8 hours yields even better results.
In this foolproof guide, I’ll walk you through every step of creating the perfect no-bake orange creamsicle cheesecake that I’ve tested and refined over 50+ attempts. From selecting the ideal crust to mastering the creamy layers and achieving those beautiful orange swirls, you’ll have all the knowledge you need to create this refreshing dessert that’s perfect for spring and summer gatherings.
Choosing the Right Crust for Your Cheesecake
The foundation of any great no-bake orange creamsicle cheesecake starts with selecting the right crust. Your choice of base doesn’t just provide structure—it contributes significantly to the overall flavor profile and eating experience.
Graham cracker vs. vanilla wafer vs. Oreo
Graham crackers remain the classic choice for many cheesecakes, offering a slightly sweet, honey-cinnamon flavor that provides a neutral canvas. For no-bake recipes specifically, graham cracker crusts can taste somewhat plain without the toasty notes that develop during baking. Nevertheless, they create a reliable foundation that lets the orange creamsicle layers shine.
Vanilla wafers offer a more subtle flavor profile that pairs beautifully with the citrus elements in orange creamsicle cheesecake. Their delicate sweetness complements fruity and lighter fillings without overwhelming them. Some recipes specifically call for vanilla wafers as they create a softer texture that contrasts nicely with the creamy filling.
Alternatively, Oreos (both regular and Golden varieties) create a more distinctive crust with built-in richness. Due to their higher fat content, Oreo crusts typically require less butter than graham cracker crusts. For orange creamsicle cheesecake, Golden Oreos can provide a complementary vanilla flavor that enhances the creamsicle experience.
How to get the perfect crumb texture
The secret to an ideal crust begins with achieving the proper crumb consistency. Whether using a food processor or the zip-top bag method with a rolling pin, aim for very fine, uniform crumbs. Larger pieces can cause your crust to crumble upon serving.
For graham crackers, you’ll need about 12 full sheets to yield approximately 1½ cups (180g) of crumbs. Meanwhile, Oreo crusts work best with regular Oreos rather than Double Stuf varieties, as the extra cream filling can affect how well the crust binds.
Test your crumb mixture by pinching it between your fingers—it should hold together without being overly wet. If it’s too dry, add melted butter one tablespoon at a time until reaching the proper consistency.
Tips for pressing and setting the crust
The technique used to press your crust matters tremendously. First, pour your crumb mixture into your springform pan or pie plate. Start by building up the walls, using a measuring cup to firmly press crumbs against the sides. Next, work toward the middle, compressing the bottom layer with even pressure.
For no-bake crusts specifically, press firmly enough to compact the crumbs without making them too dense. A flat-bottomed measuring cup creates an even surface and helps achieve consistent thickness throughout.
After shaping your crust, refrigerate it for 20-30 minutes before adding any filling. This chilling period is crucial for no-bake orange creamsicle cheesecake as it allows the butter to solidify, helping the crust maintain its structure without the benefit of baking.
Making the Creamy Cheesecake and Orange Layers
Creating two distinct layers is what gives no-bake orange creamsicle cheesecake its signature appearance and flavor profile. The process requires attention to detail, yet remains surprisingly straightforward once you understand the key techniques.
Cream cheese base: ingredients and mixing tips
The foundation of your cheesecake filling begins with properly softened cream cheese. For optimal results, leave cream cheese at room temperature for at least 30 minutes before starting. This crucial step prevents lumps in your final mixture. Full-fat cream cheese (particularly brick-style Philadelphia) creates the richest, creamiest texture compared to reduced-fat alternatives.
In a large bowl, beat the softened cream cheese until smooth and fluffy, typically 1-2 minutes. Subsequently add granulated sugar (about 3/4 cup is ideal), followed by 1-2 teaspoons of vanilla extract. Beat these ingredients together until just combined—overmixing introduces too much air, potentially causing your cheesecake to crack or become unstable.
Orange gelatin layer: how to cool and combine
For the distinctive orange layer, prepare orange gelatin by dissolving it in approximately 3/4 cup boiling water. Whisk thoroughly until completely dissolved, additionally incorporating fresh orange zest for enhanced flavor. The most critical step comes next: allow this mixture to cool completely to room temperature (roughly 20-30 minutes) or briefly chill in the refrigerator for 5 minutes.
Cooling prevents the gelatin from setting prematurely yet ensures it won’t melt your whipped cream once combined. Essentially, you want the mixture cool enough to touch comfortably without any warmth remaining.
Folding in whipped cream for both layers
Whipped cream transforms both mixtures from dense to delightfully airy. In a separate bowl, whip heavy cream until stiff peaks form—the cream should hold its shape when the beater is lifted. For extra stability, incorporate a small amount of powdered sugar (around 1/2 cup) into the whipped cream.
Divide this whipped cream equally between your cream cheese mixture and cooled orange gelatin. Gently fold each portion in using a rubber spatula with an under-and-over motion rather than stirring, which would deflate the air bubbles that create your cheesecake’s light texture.
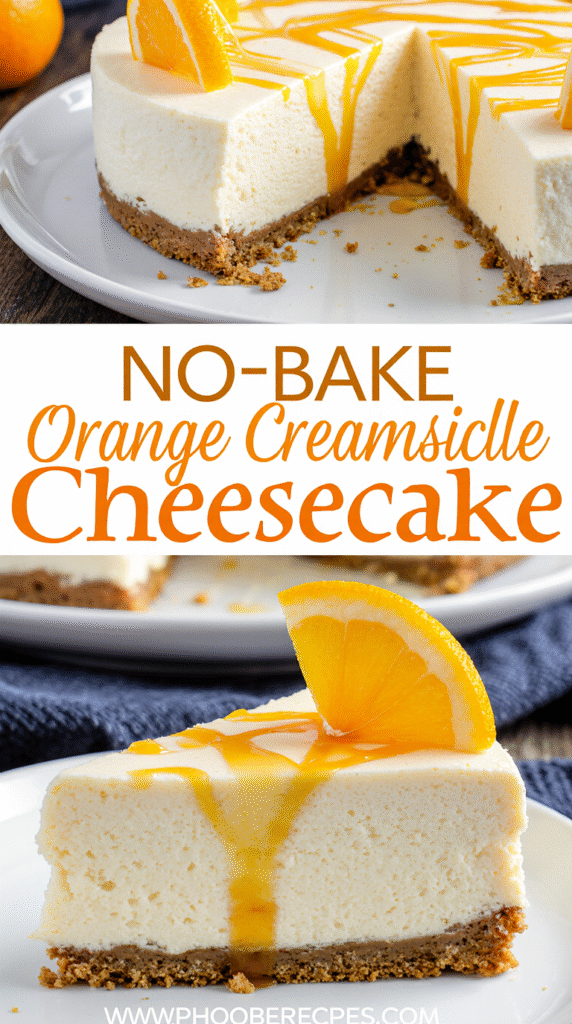
Layering and Swirling for the Perfect Look
The visual appeal of a no-bake orange creamsicle cheesecake comes from its beautiful layered presentation. Mastering the art of layering takes practice, yet the results are worth every effort.
How to alternate layers for visual appeal
First, understand that you’ll be working with two contrasting textures—the cream cheese mixture will be thick and stable while the orange mixture remains somewhat thinner. Pour approximately half of your cream cheese mixture onto the prepared crust, spreading it evenly with an offset spatula. Next, carefully add half of the orange mixture on top. Instead of pouring it all at once, use a spoon to gently place dollops across the surface.
Continue by adding the remaining cream cheese mixture in dollops over the orange layer. Don’t worry about perfect coverage—slight imperfections create that homemade charm. Finally, add the last portion of orange mixture, distributing it evenly across the top.
Swirling techniques that work best
For a classic marbled effect, use a butter knife or toothpick after completing all layers. Simply insert the tool vertically into the cheesecake and gently create S-shaped movements throughout. Alternatively, you can create a more defined pattern by dragging the knife in straight lines or circles.
Remember that less is more—excessive swirling will blend the layers too much, losing the distinct color separation. Just a few strategic swirls create the most appealing visual effect.
Common mistakes to avoid during layering
The most common pitfall is pouring layers too quickly or forcefully. This causes them to mix together prematurely, creating a muddy appearance. Furthermore, attempting to spread the thinner orange mixture like the thicker cheesecake layer often leads to frustration—dolloping works better than spreading.
Another mistake is adding layers before the previous one has had time to set slightly in the refrigerator. For distinct layers, allow 20-30 minutes of chilling time between additions.
Don’t panic if your layers look somewhat lumpy or uneven—this is normal with two different textures and contributes to the dessert’s charm.
Chilling, Garnishing, and Serving Tips
Patience becomes the secret ingredient in perfecting your no-bake orange creamsicle cheesecake after all the mixing and layering is complete. The final steps of chilling, garnishing, and serving play crucial roles in achieving that professional-quality dessert.
How long to chill for best results
For optimal texture and flavor, refrigerate your orange creamsicle cheesecake for at least 6-8 hours, although overnight chilling (12+ hours) yields the most consistent results. Initially, the filling has a mousse-like consistency around 50°F, but after properly chilling down to 40°F, it develops that signature dense, velvety cheesecake texture. Consequently, rushing this process sacrifices both flavor development and structural integrity.
First, allow the cheesecake to cool at room temperature for about an hour before refrigerating. Cover tightly with plastic wrap or aluminum foil to prevent the cheesecake from absorbing refrigerator odors. Since this dessert can be prepared 1-2 days ahead, it’s ideal for entertaining when you need to plan ahead.
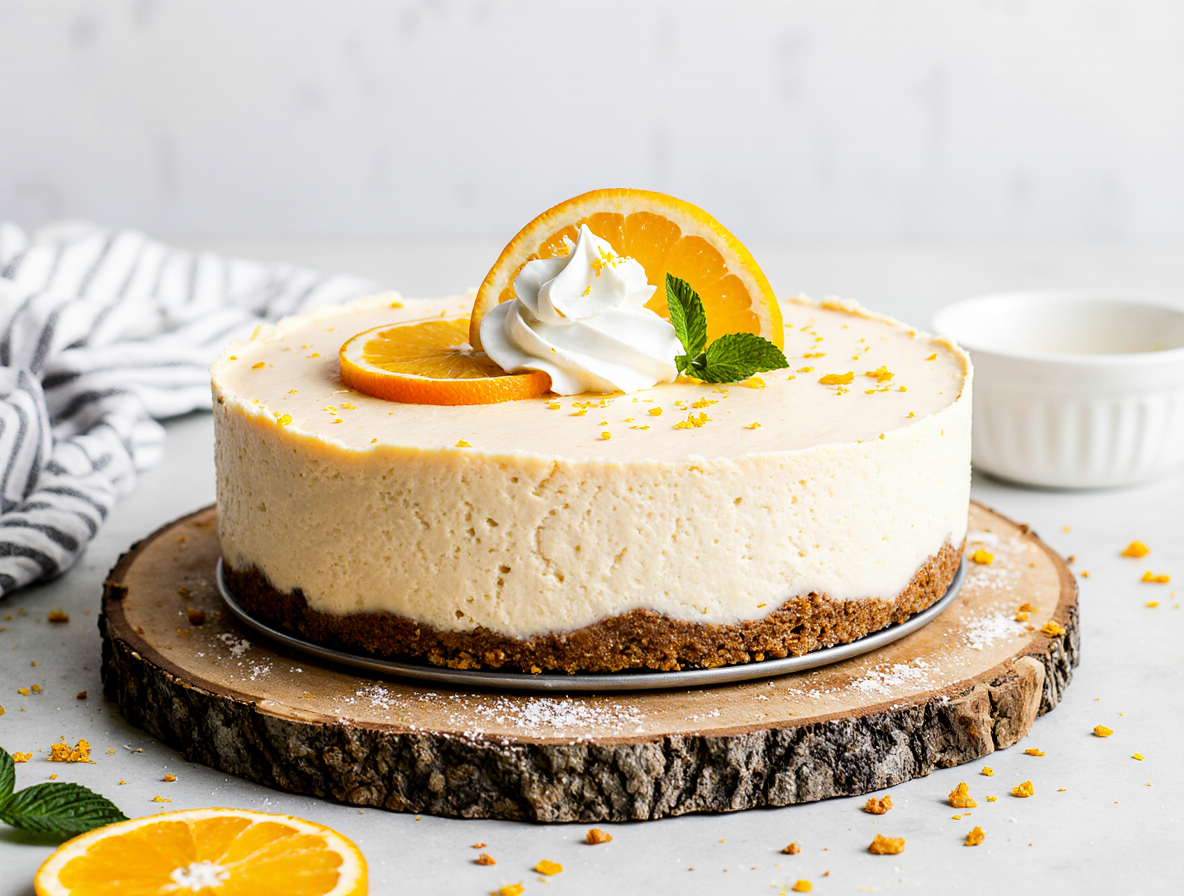
Garnish ideas: whipped cream, zest, segments
Transform your orange creamsicle cheesecake from simple to spectacular with these garnishing options:
- Freshly whipped cream piped along the edges in decorative swirls
- Orange segments arranged atop the cream or directly on the cheesecake
- Fresh orange zest sprinkled across the surface for color and aroma
- Mint leaves for a pop of contrasting color
Avoid garnishing until shortly before serving for the freshest presentation. For special occasions, try piping whipped cream with orange zest incorporated directly into it for extra flavor dimension.
Serving suggestions and slicing tips
Allow the chilled cheesecake to sit at room temperature for 10-15 minutes prior to serving for the smoothest texture. For clean, professional-looking slices:
Run a sharp knife under hot water and wipe dry between each cut. A serrated knife often works best. Start by slicing the cheesecake in half, then into quarters, eventually cutting into 12-16 evenly sized portions.
Store any leftover cheesecake in an airtight container in the refrigerator for up to 5 days. Alternatively, you can freeze portions for up to 2 months—just thaw overnight in the refrigerator before enjoying.
Conclusion
After testing this no-bake orange creamsicle cheesecake recipe countless times, I can confidently say it delivers that perfect balance of creamy vanilla and bright citrus flavors every single time. Throughout this guide, we’ve covered everything from selecting the ideal crust foundation to achieving those beautiful orange swirls that make this dessert so visually appealing.
Remember that patience truly becomes your greatest ally when making this cheesecake. The overnight chilling period allows all those delightful flavors to meld together while achieving that perfect texture we all crave. Your diligence during the layering process will certainly pay off when you slice into those beautiful orange and cream layers.
This refreshing dessert works wonderfully for any occasion, but it particularly shines during warm weather gatherings. Family and friends will undoubtedly be impressed by your culinary skills, never suspecting how simple this no-bake treat actually was to prepare. Additionally, the make-ahead nature of this cheesecake makes it perfect for stress-free entertaining.
My favorite aspect of this recipe lies in its versatility. You might choose graham crackers for a classic approach or experiment with vanilla wafers for a softer texture. Either way, the result brings back those nostalgic creamsicle flavors we loved as children, albeit in a more sophisticated dessert form.
Give yourself the gift of this foolproof recipe next time you need a show-stopping dessert without the fuss of baking. Your kitchen will stay cool, your stress levels will remain low, and everyone will surely ask for seconds. The only challenge? Making sure you save a slice for yourself!
FAQs
Q1. How long does it take to make this no-bake orange creamsicle cheesecake? While the actual preparation time is relatively short, the cheesecake needs at least 6-8 hours to chill and set properly. For best results, it’s recommended to prepare it a day in advance and let it chill overnight.
Q2. Can I use a different type of crust for this cheesecake? Yes, you can use various options for the crust. While graham crackers are classic, vanilla wafers offer a softer texture, and Golden Oreos can provide a complementary vanilla flavor. Choose based on your preference and the flavor profile you desire.
Q3. How do I achieve the perfect swirl pattern in the cheesecake? To create an appealing swirl pattern, use a butter knife or toothpick to make gentle S-shaped movements throughout the layered mixture. Remember that less is more – just a few strategic swirls will create the most visually appealing effect without over-mixing the layers.
Q4. What’s the best way to slice this cheesecake for a clean presentation? For clean, professional-looking slices, run a sharp knife under hot water and wipe it dry between each cut. A serrated knife often works best. Start by slicing the cheesecake in half, then into quarters, and finally into 12-16 evenly sized portions.
Q5. How should I store leftover cheesecake, and how long will it keep? Store any leftover cheesecake in an airtight container in the refrigerator for up to 5 days. You can also freeze portions for up to 2 months – just thaw overnight in the refrigerator before enjoying.