

Easy Butterfinger Balls Recipe: Perfect Party Treats in 20 Minutes
Looking for butterfinger balls that will impress your guests without keeping you stuck in the kitchen? We’ve got the perfect solution! These bite-sized treats take just 20 minutes to prepare, with an additional 30 minutes of chilling time, making them ideal for last-minute gatherings.
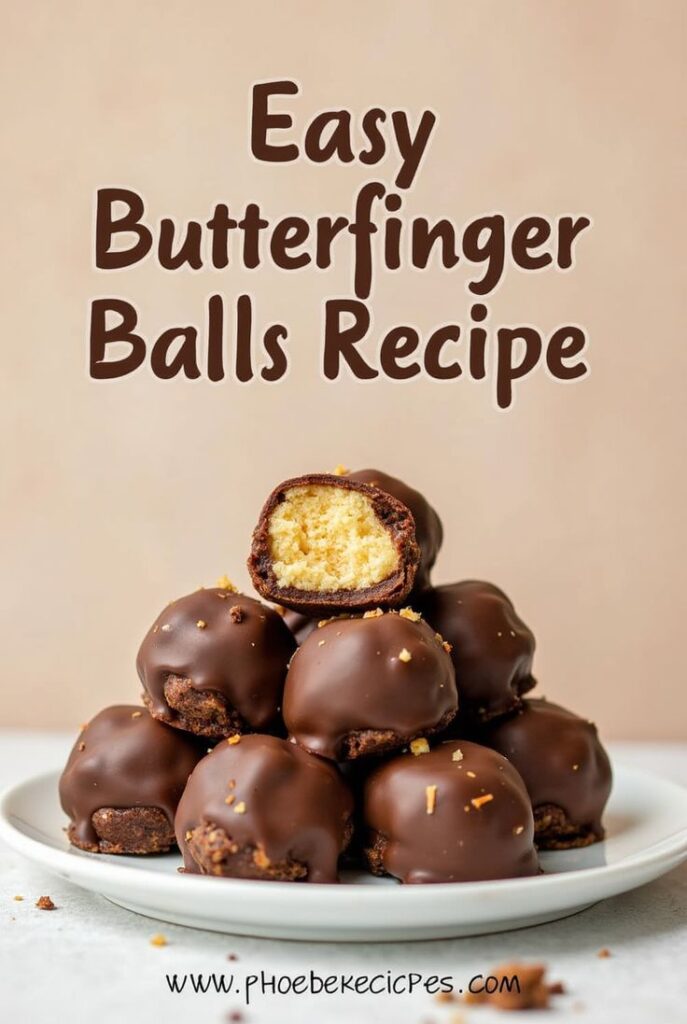
The recipe for butterfinger balls is actually incredibly simple, requiring just a few basic ingredients like peanut butter, powdered sugar, and crushed Butterfinger bars. Additionally, this easy butterfinger balls recipe yields approximately 3-4 dozen balls depending on size – perfect for serving a crowd! Because they’re a no-bake dessert, you’ll save valuable time and effort compared to traditional baking methods. We love how these treats can be stored in the refrigerator for up to a week or frozen for up to 3 months, making them a convenient make-ahead option for your next party.
Ready to learn how to make butterfinger balls that everyone will rave about? Let’s dive into this simple recipe for butterfinger balls that’s sure to become your go-to party treat!
Gather Your Ingredients
Before diving into our butterfinger balls adventure, let’s gather everything we need. The beauty of this recipe lies in its simplicity – just a few basic ingredients will transform into impressive party treats with minimal effort.
Peanut butter, butter, and powdered sugar
The foundation of perfect butterfinger balls starts with these three essential ingredients:
Peanut butter forms the heart of this recipe, with most versions calling for 1 to 1½ cups. While creamy peanut butter works best for a smooth texture, you can substitute crunchy peanut butter for extra texture. However, avoid natural peanut butter as it’s too oily and will prevent your balls from setting properly.
Butter adds richness and helps bind everything together. You’ll need about ¼ to ½ cup of softened (not melted) butter. Using unsalted butter gives you better control over the final flavor.
Powdered sugar provides sweetness and structure, with recipes typically calling for 1 to 4 cups depending on your desired sweetness level and texture. This ingredient helps achieve that perfect consistency that holds shape when rolled into balls.
Crushed Butterfinger bars
The star ingredient! You’ll need approximately 5-6 fun-sized Butterfinger bars (about ½ to 1 cup when crushed). These candy bars provide the distinctive crunch and unique caramelized flavor that makes this treat so irresistible.
For consistent results, crush your Butterfinger bars into small, even pieces. You can place them in a sealed plastic bag and crush with a rolling pin or pulse them briefly in a food processor for more uniform pieces.
Chocolate chips or bark for coating
To create that beautiful outer shell, you’ll need:
Chocolate coating options: Semi-sweet chocolate chips (2-3 cups) work wonderfully, though chocolate almond bark or melting wafers (8-10 ounces) provide an exceptionally smooth finish that’s easier to work with.
For smoother chocolate consistency, consider adding 1 tablespoon of coconut oil or vegetable shortening to your melted chocolate. This creates a thinner coating that’s perfect for dipping.
Optional add-ins and toppings
Personalize your butterfinger balls with these optional ingredients:
Vanilla extract (½-1 teaspoon) enhances the overall flavor profile.
Graham cracker crumbs (¾ cup) add structure and a complementary flavor.
Decorative toppings like additional crushed Butterfinger pieces, festive sprinkles, or even a light sprinkle of coarse sea salt can elevate the presentation for special occasions.
For creative variations, consider swapping Butterfingers with other candy bars like Snickers or Reese’s Peanut Butter Cups. Each alternative brings its own unique flavor while maintaining the same basic preparation method.
How to Make Butterfinger Balls
Now that we have all our ingredients ready, let’s explore how to make butterfinger balls step by step. This no-bake process is straightforward yet yields impressive results.
Mix the base ingredients
First, combine the peanut butter and softened butter in a large bowl. Using an electric mixer creates a creamy, lump-free mixture. Beat until smooth and well-combined. Add vanilla extract and mix thoroughly throughout the mixture. Next, gradually incorporate the powdered sugar in batches while mixing on low speed. Remember to scrape down the sides of the bowl periodically to ensure everything blends evenly.
Add crushed candy and shape into balls
Once your base is prepared, gently fold in the crushed Butterfinger pieces and graham cracker crumbs if using. This step transforms your kitchen into a delightful candy-scented haven! Using a cookie scoop or your hands, portion about 1 to 1½ tablespoons of mixture for each ball. Roll between your palms to create smooth, uniform balls. This recipe typically yields about 3-4 dozen balls, depending on their size.
Chill before dipping
Place your shaped balls on a parchment-lined baking sheet, ensuring they don’t touch each other. Subsequently, refrigerate for approximately 30 minutes or freeze for 30 minutes. This crucial step helps the balls firm up, allowing them to maintain their shape when dipped in chocolate.
Melt and dip in chocolate
Melt your chocolate in a microwave-safe bowl using 30-second intervals at 50% power, stirring between each cycle. For smoother chocolate, add a tablespoon of vegetable shortening or oil. As soon as the chocolate is melted:
- Remove balls from refrigerator
- Using a fork or toothpick, dip each ball into chocolate
- Tap off excess chocolate before placing back on parchment paper
Decorate and let set
While the chocolate is still wet, sprinkle additional crushed Butterfinger pieces on top for extra crunch and visual appeal. For special occasions, consider holiday sprinkles or a light dusting of sea salt. Finally, allow the chocolate to set completely before serving—this typically takes 10-15 minutes at room temperature.
Tips and Variations
Want to take your butterfinger balls to the next level? These expert tips and creative variations will help you customize this delicious treat to your preferences.
Use crunchy or creamy peanut butter
Both creamy and crunchy peanut butter work wonderfully in butterfinger balls, depending on your texture preference. Creamy peanut butter creates a smoother consistency, whereas crunchy adds extra texture with bits of peanuts. Particularly important is using regular commercial peanut butter brands like Jif or Skippy rather than natural varieties. Natural peanut butter contains too much oil, preventing the balls from setting properly. Furthermore, mainstream sweetened peanut butters provide better texture and flavor for this recipe—less crumbly and more cohesive.
Try different candy bar substitutes
Indeed, butterfinger balls are incredibly versatile when it comes to candy options. If you don’t have Butterfinger bars on hand, consider these alternatives:
- Reese’s Peanut Butter Cups or Snickers for a different but complementary flavor profile
- Kit Kat bars for a unique wafer crunch
- Crushed pretzels for a delightful salty-sweet combination
- Rice Krispies as a substitute for corn flakes in homemade versions
For those who love experimenting, you might even try adding crushed corn flakes, which some say creates a texture closest to authentic Butterfinger.
Add sprinkles or sea salt for flair
Elevate your butterfinger balls with decorative touches that enhance both appearance and flavor. Sprinkle crushed Butterfinger pieces on top before the chocolate sets for extra crunch and visual appeal. Likewise, seasonal sprinkles can transform these treats for holidays—Christmas, Halloween, Easter, or patriotic themes. Moreover, a light dusting of sea salt creates a sophisticated sweet-salty balance. For special occasions, try drizzling with contrasting chocolate or peanut butter for an elegant presentation.
Use a fork or toothpick for dipping
The dipping technique significantly impacts the final appearance of your butterfinger balls. A fork works exceptionally well for full chocolate coverage, allowing excess to drip off for a smooth finish. Alternatively, toothpicks help when you prefer not to submerge the entire ball. In fact, if your chocolate seems too thick, add a teaspoon of vegetable oil or coconut oil to thin it for easier dipping. Consequently, you’ll achieve that professional-looking coating every time.
Storage and Make-Ahead Options
These delicious butterfinger balls deserve proper storage to maintain their wonderful taste and texture. With the right techniques, you can prepare them well ahead of your next gathering.
Refrigeration tips
Store your butterfinger balls in an airtight container in the refrigerator to preserve freshness. For optimal results, place a sheet of parchment paper or wax paper between layers to prevent sticking. Before serving, allow them to sit at room temperature for 10-15 minutes to enhance their flavor. Although refrigerated, these treats maintain their delightful crunch remarkably well.
For an upcoming event, these make perfect advance preparations. They stay fresh in the refrigerator for varying durations, depending on storage quality. Most sources recommend 1-2 weeks, whereas others suggest they can last up to 3-4 weeks when properly stored.
Freezing instructions
For longer storage, freezing butterfinger balls works wonderfully. First, place them on a baking sheet in a single layer and freeze until solid. Afterwards, transfer them to a freezer-safe container or ziplock bag, removing as much air as possible before sealing.
Given that these treats freeze exceptionally well, you can make them months in advance for holidays or special occasions. This is especially helpful for party planning or getting ahead on holiday baking.
How long they last
Storage duration varies by method:
- Room temperature: 1-5 days (best for immediate consumption)
- Refrigerated: 1-4 weeks (depending on container quality)
- Frozen: 2-6 months (most sources recommend 3 months)[201]
Essentially, these treats offer exceptional longevity when stored properly, making them ideal for busy hosts.
Best containers to use
Airtight containers are absolutely crucial for maintaining freshness. For refrigeration or room temperature storage, plastic containers with secure lids work perfectly. During storage, remember to place parchment or wax paper between layers to prevent sticking.
For freezing, initially use a baking sheet for flash freezing, then transfer to freezer bags or containers. Squeeze out excess air from freezer bags to prevent freezer burn. For thawing, simply place in the refrigerator overnight or let sit at room temperature for 30 minutes.
Conclusion
Conclusion
Butterfinger balls certainly deserve a place in your recipe collection due to their irresistible taste and remarkable simplicity. These delectable treats require minimal ingredients yet deliver maximum flavor with every bite. Additionally, their no-bake nature saves precious time, making them perfect for busy hosts or last-minute gatherings. The versatility of this recipe allows for endless customization – swap candy bars, experiment with toppings, or adjust ingredients to suit your preferences.
The make-ahead potential of these treats stands out as another significant advantage. Your butterfinger balls will remain fresh for weeks in the refrigerator or months in the freezer, therefore eliminating day-of party stress. This convenience factor, combined with their crowd-pleasing taste, transforms them into the ultimate party solution.
We love how these bite-sized delights bring smiles to guests’ faces without requiring professional baking skills. The straightforward preparation process yields impressive results that look like they demanded hours of work. Furthermore, their portability makes them ideal for potlucks, holiday gatherings, or simple family treats.
Overall, butterfinger balls represent the perfect balance between effort and reward. The next time you need a quick, delicious dessert that impresses everyone, remember this simple recipe. Your friends and family will undoubtedly ask for seconds – and for the recipe!
FAQs
Q1. How long do Butterfinger Balls stay fresh? When stored in an airtight container in the refrigerator, Butterfinger Balls can stay fresh for 1-2 weeks. For longer storage, they can be frozen for up to 3 months.
Q2. Can I use natural peanut butter for Butterfinger Balls? It’s best to avoid natural peanut butter for this recipe. Regular commercial brands like Jif or Skippy work better as they provide the right texture and help the balls set properly.
Q3. What can I use instead of Butterfinger bars? You can substitute Butterfinger bars with other candy options like Reese’s Peanut Butter Cups, Snickers, Kit Kat bars, or even crushed pretzels for a different flavor profile.