
Perfect Brookies Recipe: Secret Tips for Fudgy Cookie-Brownies
Ever been torn between making brownies or cookies? Brookies ultimately solve this delicious dilemma by combining the best of both worlds. These delightful treats are part brownie, part cookie, together creating the ultimate dessert mash-up that has quickly become one of my favorite indulgences.
What makes our brookies recipe special is how incredibly soft, chewy, and fudgy they turn out. Additionally, they’re packed with layers of chocolatey goodness, thanks to both melted dark chocolate and chocolate chips folded into the batter. Whether you’re looking for how to make brookies for a party or simply satisfying your chocolate cravings, these rich treats can be cut into small slices to feed a large group. The best part? Homemade brookies require only a few ingredients and less than one hour to prepare, making them perfect for last-minute dessert emergencies.
In this guide, I’ll share all my secret tips for creating the perfect chewy fudgy chocolate brookies that will have everyone asking for your recipe.
What Makes Brookies So Irresistible
Brookies stand out in the dessert world as a brilliant mashup that combines two beloved classics. The magic happens when rich, fudgy brownies meet buttery, chewy chocolate chip cookies in a single treat. This ingenious combination means you’ll never have to choose between your favorite desserts again.
The perfect mix of brownie and cookie textures
What truly makes brookies exceptional is their contrasting yet complementary textures. The brownie layer delivers that rich, fudgy consistency that melts in your mouth, while the cookie portion provides a buttery, slightly chewy experience with crisp edges. This textural harmony creates an incredible mouthfeel that’s impossible to achieve with either dessert alone.
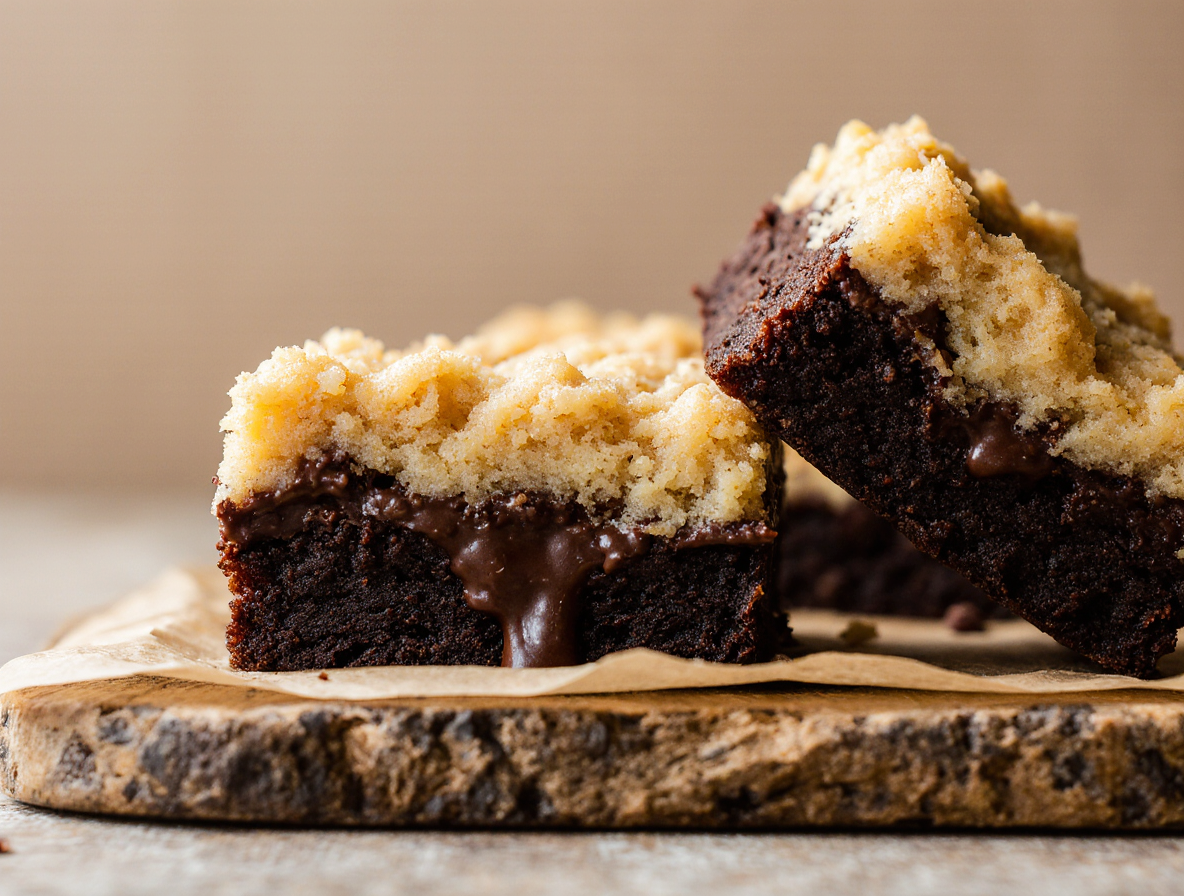
The brownie base should be ultra-fudgy and moist—definitely not cakey. Meanwhile, the cookie component adds that perfect balance of chewiness with slightly crisp edges. Some recipes layer them, while others marble the batters together, creating distinct zones where you can taste both treats individually yet experience them as a unified dessert.
Why chewy and fudgy is the goal
When making brookies, achieving the perfect chewy and fudgy consistency is essential. A properly made brookie has a brownie layer that stays moist for days without drying out when stored correctly. The ideal texture should never be dry or cakey but rather rich and gooey.
The cookie portion should be chewy and buttery, complementing the gooey brownie layer. This creates a dessert with incredible depth that you can really sink your teeth into. The contrasting yet harmonizing textures make each bite an adventure in sensation.
Furthermore, the right balance of ingredients creates that coveted shiny, crackly top that’s characteristic of perfect brownies. This visual element adds to the appeal, making brookies not just delicious but beautiful to look at.
How brookies satisfy every chocolate craving
Brookies are a chocolate lover’s dream, satisfying multiple cravings in one go:
- They deliver an intense chocolate flavor from the brownie portion while offering the classic buttery cookie taste
- The varied textures address different preference needs—some days you want something fudgy, other days something chewy
- With chocolate in multiple forms (melted chocolate, cocoa powder, and chocolate chips), they provide a multi-dimensional chocolate experience
Indeed, brookies are the ultimate answer for indecisive dessert lovers. They’re rich without being overwhelming, complex yet familiar, and offer the perfect balance between two classic treats. For those moments when you need pure comfort and chocolate indulgence, nothing satisfies quite like a perfectly made brookie.
Essential Ingredients for the Best Brookies
The secret to perfect brookies lies in understanding the role of each ingredient. After testing countless recipes, I’ve discovered that the quality and type of each component significantly impacts the final texture and flavor of these chocolate-laden treats.
Choosing the right chocolate
For truly exceptional brookies, I recommend using dark chocolate with 60-85% cocoa solids. Specifically, Lindt 90% chocolate creates an intensely rich brownie base that perfectly balances the sweeter cookie layer. When selecting chocolate chips, look for ones labeled “backstabil” (in European markets) as they maintain their shape during baking instead of completely melting away.
High-quality cocoa powder makes a dramatic difference in flavor depth. I prefer Dutch-processed cocoa powder (like Hershey’s Special Dark) for its deeper color and more intense chocolate profile. Adding a touch of instant coffee to the brownie batter enhances the chocolate flavor without tasting like coffee.
The role of sugars: caster vs. demerara
Sugar does more than just sweeten your brookies. Caster sugar (superfine granulated sugar) dissolves quickly, making it ideal for creating that shiny, crackly brownie top we all love. However, demerara sugar, with its large amber crystals and subtle molasses flavor, adds wonderful texture when sprinkled on top before baking.
Brown sugar contributes essential moisture and a caramelized flavor that’s crucial for chewy cookies. The ratio of white to brown sugar directly impacts texture—more white sugar creates crispier edges, while more brown sugar promotes chewiness.
Why room temperature eggs matter
Room temperature eggs (68°F-72°F) are non-negotiable for perfect brookies. Cold eggs can cause the butter to harden, resulting in a curdled batter and dense final product. Moreover, room temperature eggs whip to a much greater volume, incorporating more air for a lighter texture.
If you’re short on time, place cold eggs in warm water for 10-15 minutes. Although not as effective as truly room temperature eggs, this quick method is far better than using refrigerator-cold eggs.
Flour, cocoa, and leavening agents explained
All-purpose flour provides the structure for both layers, though the amounts differ significantly between them. The brownie layer needs less flour for that fudgy texture we crave.
Pay close attention to leavening agents—baking powder belongs in the brownie layer for a rich, fudgy texture, while baking soda helps the cookie layer rise properly. Confusing these two ingredients is a common mistake that can ruin your brookies.
How to Make Brookies Step-by-Step
Creating perfect brookies requires attention to technique. Let’s break down the process into clear, manageable steps that will help you achieve that ideal balance between fudgy brownies and chewy cookies.
1. Melt chocolate and butter properly
Begin by melting your chocolate and butter together. You can do this in a heatproof bowl over simmering water (double boiler method) or in the microwave with 30-second intervals. The key is gentle heat—avoid overheating which can burn the chocolate. Once melted, the mixture should be smooth and glossy. For the brownie portion, stir in cocoa powder while the mixture is still warm to enhance the chocolate flavor.
2. Whip eggs and sugars until fluffy
This step is crucial for achieving that signature crinkly top on your brookies. Using an electric mixer, whip the eggs and sugars together until the mixture becomes pale, thick, and has nearly tripled in volume—about 6-7 minutes. For the brownie component, this extended whipping creates the shiny, paper-thin top everyone loves. In the cookie dough, proper creaming of butter and sugars until light and fluffy builds the foundation for chewy cookies.
3. Combine dry ingredients without lumps
In a separate bowl, whisk together your flour, cocoa powder, salt, and leavening agents. Sifting these ingredients helps eliminate lumps and ensures even distribution. For the brownie layer, use less flour for that fudgy texture. For the cookie portion, mix just until you see a few flour streaks remaining—these will incorporate when you add chocolate chips.
4. Fold everything together gently
Folding is where technique truly matters. Add the melted chocolate mixture to your egg mixture gradually, folding gently but thoroughly. Use a large silicone spatula and employ a specific motion: cut down through the center, scrape along the bottom, and fold over the top. This preserves air bubbles that contribute to proper texture. Continue until just combined—overmixing deflates the batter and results in dense brookies.
5. Scoop and bake with precision
Line your baking pan with parchment paper, allowing overhang for easy removal. For classic brookies, alternate dollops of brownie batter and cookie dough, creating a marbled effect. For layered brookies, spread brownie batter first, then top with cookie dough chunks. Bake at 350°F, covering with foil after 15-20 minutes to prevent excessive browning while allowing the center to fully bake.
6. Cool and finish with sea salt
Allow brookies to cool completely in the pan—this is non-negotiable. The brownie layer needs time to set properly. For perfectly clean cuts, chill the brookies for an hour before slicing. Just before serving, sprinkle with flaky sea salt to enhance all the chocolate flavors and add a sophisticated contrast to the sweetness.
Secret Tips for Fudgy Cookie-Brownies
The difference between good brookies and extraordinary brookies often comes down to technique. After baking countless batches, I’ve discovered several game-changing tips that elevate these chocolate treats from merely tasty to absolutely irresistible.
Avoid overmixing the batter
Overmixing is the number one enemy of perfect brookies. For the brownie portion, mix just until ingredients are combined—overmixing develops gluten, resulting in tough, dense brownies instead of that fudgy texture we’re after. As a general rule, stop mixing once there are still some flour streaks showing, as these will incorporate when you add chocolate chips.
For the cookie layer, use the same principle: stir until just combined, especially after adding dry ingredients. Essentially, when you see the flour nearly disappear, put down the spoon.
Use a cookie scoop for even baking
A cookie scoop isn’t just for convenience—it’s crucial for consistency. When dolloping cookie dough across your brownie base, using a scoop ensures uniform distribution and even baking. Consequently, your brookies will cook at the same rate, preventing some portions from overdrying while others remain underbaked.
Let brookies cool on the tray
Patience truly pays off when making brookies. Allow them to cool completely in the pan before attempting to slice—this is non-negotiable. In fact, waiting at least 60 minutes after baking helps both layers set properly. For especially gooey brookies, refrigerate the pan after most of the heat has dissipated to make cutting cleaner.
How to fix flat or dry brookies
If your brookies turn out flat, your butter was likely too warm. Cold ingredients prevent excessive spreading. Conversely, dry brookies almost always result from overbaking. Remove them when a toothpick inserted in the brownie section comes out with a few moist crumbs—not wet batter, but definitely not clean.
Substitutions that work (and don’t)
For substitutions that actually improve your brookies, consider browned butter for deeper flavor in either layer. In addition, instant coffee can replace espresso powder to enhance chocolate flavor without adding coffee taste. Nonetheless, avoid substituting compound chocolate, which creates unstable results. Above all, regardless of which substitutions you try, maintain the critical butter-to-sugar ratio that determines chewiness versus fudginess.
Conclusion
Brookies truly represent the best of both dessert worlds. Throughout this guide, we’ve explored how these chocolate-laden treats combine fudgy brownies with chewy cookies for an irresistible texture combination. Certainly, the quality of ingredients matters tremendously – from selecting high-percentage dark chocolate to using room temperature eggs and the right balance of sugars.
Remember, technique plays an equally important role. Gentle folding prevents overmixing, while proper whipping creates that signature crinkly top. Additionally, allowing your brookies to cool completely before cutting ensures perfect texture development.
What makes brookies so special, ultimately, is their versatility. They satisfy multiple chocolate cravings simultaneously while offering that perfect balance between two beloved desserts. Whether you’re baking for a party or simply treating yourself, these tips will help you create bakery-quality brookies every time.
The next time you find yourself torn between making cookies or brownies, why choose? Brookies deliver both experiences in one decadent treat. After mastering this recipe, you might never go back to making just one dessert again! Therefore, gather your ingredients, preheat your oven, and prepare to amaze everyone – yourself included – with these perfect fudgy cookie-brownies.
FAQs
Q1. How can I achieve the perfect fudgy texture in my brookies? To get fudgy brookies, minimize air in the batter, use just a touch of leavening agent, and avoid overmixing. Use melted butter in the cookie portion for a similar fudgy texture. Remember to take them out of the oven when a toothpick inserted comes out with a few moist crumbs.
Q2. What’s the ideal baking time for brookies? Bake brookies at 350°F (175°C) for about 20-28 minutes. The cookie layer should be lightly golden, and the center should be set but slightly wobbly. It’s better to slightly underbake than overbake to maintain fudginess.
Q3. Should the brownie layer be on top or bottom when making brookies? Typically, the brownie layer goes on the bottom of the baking dish, with the cookie dough spread on top. This arrangement allows for the perfect balance of textures in the final product.
Q4. How long should I let brookies cool before cutting? Allow brookies to cool completely in the pan for at least 60 minutes at room temperature. For cleaner cuts, you can refrigerate them for an additional hour after they’ve cooled down.
Q5. What’s the secret to getting that shiny, crackly top on brookies? The key to achieving that signature crinkly top is properly whipping the eggs and sugars until the mixture becomes pale, thick, and has nearly tripled in volume—about 6-7 minutes of mixing. This extended whipping creates the shiny, paper-thin top everyone loves.