

Perfect Pancake Recipe: Grandma’s Secret for Fluffy Results (With Photos)
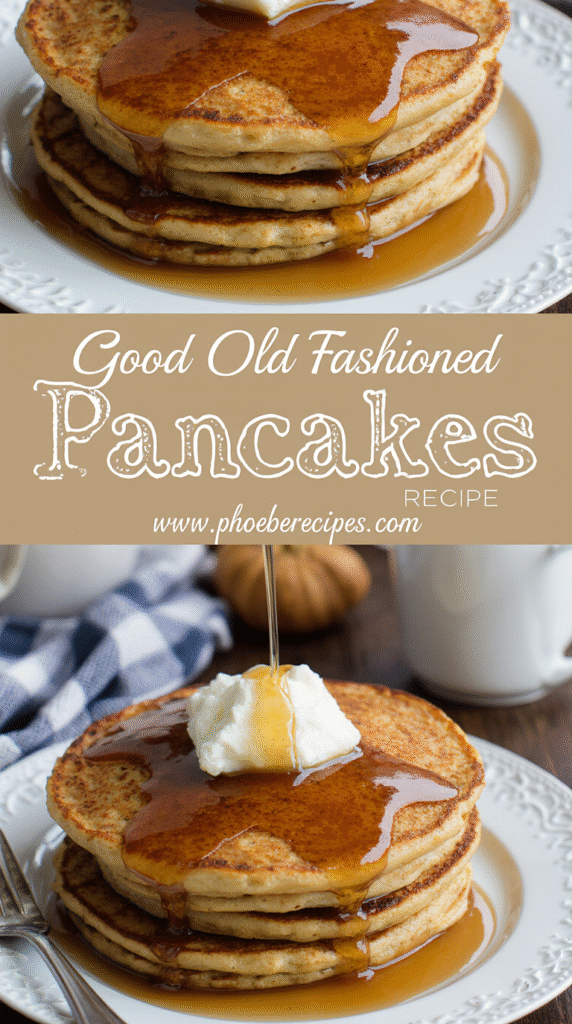
Perfect pancake recipe secrets aren’t complicated, but they certainly produce remarkable results. Every weekend in our house, we enjoy these breakfast classics with their golden-crisp exteriors and incredibly fluffy interiors—just like the ones our grandmothers used to make.
These homemade pancakes require only basic pantry staples: flour, baking powder, sugar, milk, eggs, and butter. However, the magic isn’t just in the ingredients but in the technique. Our old-fashioned pancake recipe delivers consistent results because it follows grandma’s time-tested methods. Specifically, using the right temperature on your griddle (about 350 degrees) ensures those picture-perfect results.
The beauty of this fluffy pancake recipe is its simplicity. Essentially, grandma’s pancake recipe has been perfected over generations, delivering approximately 158-163 calories per serving with 5-6g of protein. Moreover, you’ll discover why baking powder is the true secret behind achieving that irresistible fluffiness.
In this guide, we’ll share everything you need to know about creating old-fashioned pancakes that will become your family’s new tradition.
Grandma’s Essential Pancake Ingredients
The foundation of grandma’s legendary pancakes begins with carefully selected ingredients that work together in perfect harmony. I’ve learned through years of making this family recipe that quality matters just as much as technique when crafting these breakfast classics.
Flour and leavening agents
At the heart of any old fashioned pancake recipe is all-purpose flour, which provides the structure. For truly fluffy pancakes, I always sift my flour to remove lumps and incorporate air. The real magic happens with the leavening agents – primarily baking powder. For each cup of flour, I add 1 tablespoon of baking powder, which creates those tiny air pockets that make pancakes rise beautifully. Some recipes also include a pinch of baking soda (about ¼ teaspoon) to balance acidity and enhance browning. Furthermore, a small amount of salt (typically ½ teaspoon) is crucial to enhance flavors.
The role of eggs and milk
Eggs serve as the binding agent in grandma’s pancake recipe, providing structure while adding richness. One to two eggs per batch is ideal – too many makes pancakes rubbery, while too few results in fragile cakes. Meanwhile, milk adds necessary moisture and helps control the batter’s thickness. I typically use 1¼ cups of milk per cup of flour, though this can be adjusted based on desired thickness. Whole milk creates the richest flavor, although 2% works well too. Additionally, buttermilk can be substituted for regular milk to create tangier, more tender pancakes due to its acidity.
Butter vs oil: what grandma used
While many modern recipes call for vegetable oil, grandma always insisted on melted butter – approximately 2-3 tablespoons per batch. Butter imparts a richer flavor profile and contributes to that golden-brown exterior that makes homemade pancakes so irresistible. I melt the butter first, then let it cool slightly before incorporating it into the wet ingredients. This prevents it from cooking the eggs prematurely. In a pinch, oil can work, though the flavor won’t be quite as complex.
Optional add-ins for flavor
The basic fluffy pancake recipe is a canvas for countless variations. Vanilla extract (½-1 teaspoon) enhances sweetness without adding sugar. For fruit pancakes, fresh blueberries or thinly sliced bananas can be gently pressed into the batter once poured on the griddle. Chocolate chips, cinnamon (¼ teaspoon), or a touch of lemon zest can transform the basic recipe. Notably, grandma occasionally added a tablespoon of sugar to the batter, though the maple syrup topping usually provides sufficient sweetness for most palates.
Step-by-Step: How to Make Grandma’s Pancakes
Creating grandma’s perfect pancakes involves mastering a sequence of simple yet precise techniques. The process transforms basic ingredients into those iconic golden disks with fluffy interiors that my family has cherished for generations.
1. Sift and mix dry ingredients
I always start by sifting the all-purpose flour into a large mixing bowl to eliminate lumps and incorporate air. Next, I add the baking powder, salt, and occasionally that tablespoon of sugar. Using a whisk, I thoroughly combine these dry ingredients until they’re evenly distributed. This crucial step ensures the leavening agents are properly dispersed throughout the flour, creating uniform rising once cooking begins.
2. Add wet ingredients and combine
In a separate bowl, I whisk the eggs until slightly frothy, subsequently adding the milk and cooled melted butter. Once the wet ingredients are combined, I make a well in the center of the dry ingredients and pour the wet mixture in. Using a wooden spoon or rubber spatula (never a whisk at this stage), I gently fold everything together with just 10-12 strokes. The batter should remain somewhat lumpy – this is the secret to tender pancakes!
3. Let the batter rest
Grandma always insisted on letting the batter rest for 15-30 minutes. During this time, the flour absorbs the liquid, gluten relaxes, and the baking powder begins working its magic. This patience yields significantly fluffier results than rushing straight to cooking. If you’re short on time, even 5 minutes makes a difference.
4. Heat the pan just right
I preheat a heavy skillet or griddle over medium heat until drops of water dance and evaporate quickly when sprinkled on the surface. A properly heated pan prevents sticking and creates that perfect golden exterior. I lightly brush the surface with butter just before pouring the batter.
5. Pour and cook the pancakes
Using a 1/4 cup measuring cup, I pour portions of batter onto the hot surface, giving them space to spread. For perfectly round pancakes, I pour from a consistent height and avoid the urge to spread the batter with the measuring cup.
6. Flip when bubbles appear
Once bubbles form across the surface and the edges look set (about 2-3 minutes), it’s time to flip. I use a thin spatula, sliding it completely underneath before confidently turning the pancake in one swift motion. The second side needs just 1-2 minutes until golden brown and completely cooked through.
Grandma’s Secrets for Fluffy Pancakes
Beyond ingredients and basic steps, what truly distinguishes grandma’s pancakes are her time-honored techniques. These little secrets make the difference between ordinary and extraordinary results.
Don’t overmix the batter
The cardinal rule in grandma’s kitchen was always “less is more” when mixing pancake batter. Indeed, those lumps you see aren’t mistakes—they’re intentional! Overmixing activates the gluten in flour, creating tough, rubbery pancakes instead of light, fluffy ones. I still hear grandma saying, “Just 10-12 gentle strokes with a wooden spoon is all you need.” The batter should look somewhat lumpy and inconsistent—this is exactly what you want.
Use room temperature ingredients
Grandma insisted on setting eggs and milk out about 30 minutes before mixing. Room temperature ingredients blend more uniformly and create a smoother batter. Cold ingredients, especially eggs, can shock the batter and prevent proper rising. Warm milk also helps melted butter incorporate without solidifying into tiny chunks.
Let the batter sit before cooking
Patience yields perfection! Allowing the batter to rest for 15-30 minutes accomplishes two crucial things: the flour fully absorbs the liquid, and the leavening agents begin working. During this resting period, gluten strands relax while bubbles form throughout the batter. Afterward, your pancakes will rise higher and develop a more tender texture.
Use a lid for even cooking
Surprisingly, grandma often covered the pan with a lid for the first minute of cooking. This traps steam, helping pancakes cook more evenly throughout rather than just on the bottom. The result? Pancakes that rise beautifully with consistent texture from edge to center.
Why she never used boxed mix
“Those boxes are for people who don’t know better,” grandma would say. Boxed mixes often contain preservatives, artificial flavors, and lower-quality ingredients. Furthermore, homemade batter allows for customization in thickness and flavor. Plus, the satisfaction of creating something truly from scratch carries its own special flavor that no box can replicate.
Storing, Reheating, and Freezing Tips
Leftover pancakes don’t have to go to waste! With proper storage and reheating techniques, you can enjoy grandma’s old fashioned pancakes throughout the week.
How to store leftover pancakes
Unlike what many believe, homemade pancakes keep remarkably well. After cooking, allow pancakes to cool completely on a wire rack before storing. For refrigeration, wrap pancakes in aluminum foil or place them in an airtight container with parchment paper between each one to prevent sticking. Properly stored, refrigerated pancakes remain fresh for up to a week. Nevertheless, separating them with wax paper or parchment prevents them from fusing together and becoming soggy.
Best way to reheat without drying out
The toaster produces the most impressive results for reheating one or two pancakes. This method creates a crispy exterior while maintaining a fluffy interior – sometimes even better than fresh off the griddle! For larger batches, preheat your oven to 350°F and place pancakes in a single layer on a baking sheet, covered with foil, for about 10 minutes. Conversely, microwaving works well for pancakes with mix-ins like chocolate chips or blueberries, but limit heating to 30-60 seconds to prevent toughness.
Can you freeze pancakes?
Absolutely! Grandma’s pancake recipe freezes beautifully. Initially, place cooled pancakes in a single layer on a baking sheet and freeze for about 20-30 minutes until solid. Afterward, stack them with parchment paper or aluminum foil between each pancake and store in a freezer-safe bag. Properly prepared frozen pancakes stay good for up to two months, though some sources suggest they’ll maintain quality for three months.
Saving leftover batter for later
Should you find yourself with extra batter, refrigerate it in an airtight container for up to 2-4 days. Nonetheless, be aware that pancakes made from stored batter might not rise as much since leavening agents lose potency over time. Fortunately, you can rejuvenate day-old batter by adding approximately one teaspoon of baking powder for every 1½ cups of leftover batter. Alternatively, freezing the batter is viable – simply thaw overnight in the refrigerator when ready to use.
Conclusion
Grandma’s pancake recipe stands the test of time because it combines simplicity with technique. Therefore, whether you’re making these fluffy delights for a weekend family breakfast or meal-prepping for busy mornings, these time-honored methods guarantee perfect results every time.
Though modern shortcuts exist, nothing quite matches the satisfaction of creating these golden, fluffy pancakes from scratch. Additionally, the flexibility to customize with various mix-ins means your family can enjoy countless variations while maintaining that classic texture we all love.
Remember those key secrets we discussed – the lumpy batter, room temperature ingredients, and that essential resting period. These seemingly small details make all the difference between ordinary pancakes and extraordinary ones. Last but certainly not least, proper storage techniques ensure you can enjoy grandma’s pancakes throughout the week without sacrificing quality.
Breakfast traditions bind families together across generations. My grandmother passed this recipe to my mother, who passed it to me, and now I’m sharing it with you. Undoubtedly, once you master these techniques, your pancakes will become the stuff of legend in your own household. Just like grandma would say, “The best recipes aren’t just about ingredients—they’re about love and patience.” Happy cooking!
FAQs
Q1. What’s the key to making pancakes extra fluffy? The secret to achieving extra fluffy pancakes lies in using the right amount of baking powder and not overmixing the batter. Letting the batter rest for 15-30 minutes before cooking also helps create those coveted air pockets.
Q2. Can I prepare pancake batter in advance? Yes, you can prepare pancake batter in advance and store it in the refrigerator for 2-4 days. However, the pancakes might not rise as much due to the leavening agents losing potency over time. To rejuvenate day-old batter, add about one teaspoon of baking powder for every 1½ cups of leftover batter.
Q3. What’s the best way to reheat leftover pancakes? For the best results, reheat one or two pancakes in a toaster. This method creates a crispy exterior while maintaining a fluffy interior. For larger batches, use an oven preheated to 350°F, placing the pancakes in a single layer on a baking sheet covered with foil for about 10 minutes.
Q4. Is it possible to freeze homemade pancakes? Absolutely! Cool the pancakes completely, then freeze them in a single layer on a baking sheet for 20-30 minutes. Once solid, stack them with parchment paper or aluminum foil between each pancake and store in a freezer-safe bag. Properly frozen pancakes can maintain their quality for up to two to three months.
Q5. Why should I use room temperature ingredients for pancakes? Using room temperature ingredients, especially eggs and milk, is important because they blend more uniformly and create a smoother batter. Cold ingredients can shock the batter and prevent proper rising. Warm milk also helps melted butter incorporate without solidifying into tiny chunks, resulting in a better texture overall.