
Perfect Red Velvet Oreo Cheesecake: A Foolproof Baker’s Guide

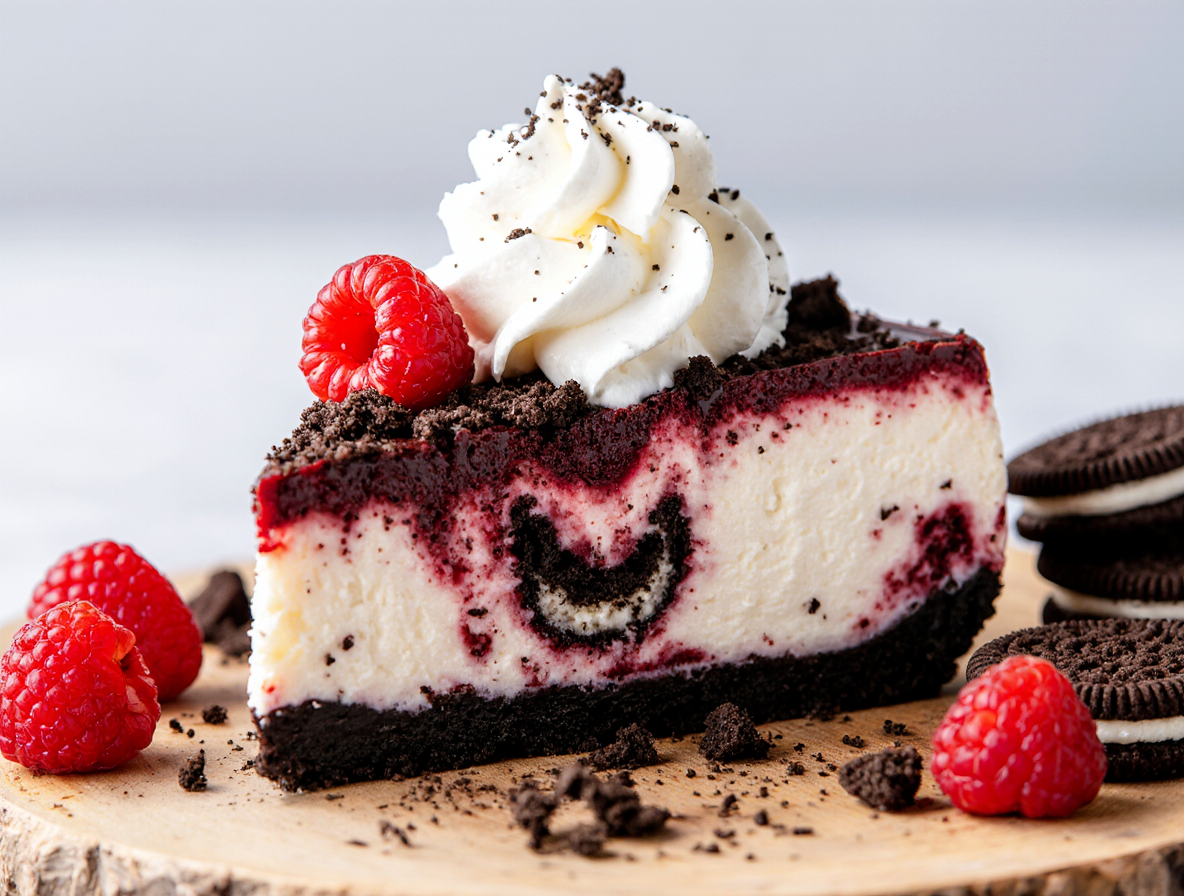
Red velvet oreo cheesecake perfectly combines decadence and indulgence in every bite. This showstopper dessert is creamy and totally irresistible thanks to a generous drizzle of melted chocolate and loads of Oreos. With only 15 minutes of hands-on time and that gorgeous red color, this recipe is sure to impress your guests.
When I discovered how easy this red velvet cheesecake recipe is, I was amazed by its value. I spend just $7.45 on ingredients here in Utah, feeding 8 people, while the cheapest pre-made option costs $8.99 with no decorations. The silky smooth velvety texture comes from a combination of cream and sour cream inside the cheesecake. Additionally, it delivers that perfect tangy-light chocolate flavor that’s reminiscent of classic red velvet cake.
Although these cheesecakes may be small in some variations, they pack a punch in both flavor and texture. The best part? This cheesecake can be stored in the fridge for up to a week or frozen for up to 3 months. In this guide, I’ll walk you through everything you need to know to create this red velvet dream with an Oreo crust that’s sure to become your new favorite dessert recipe.
Choosing the Right Ingredients for Red Velvet Oreo Cheesecake
The secret to a perfect red velvet oreo cheesecake lies in selecting high-quality ingredients. Each component plays a crucial role in creating that signature texture and flavor that makes this dessert so memorable.
Cream cheese: full-fat vs. low-fat
Full-fat cream cheese is non-negotiable for a truly decadent red velvet cheesecake. Low-fat varieties contain about half the fat of regular cream cheese, which significantly impacts the end result. When manufacturers remove fat, they typically replace it with water and stabilizers, leading to a runny, unstable batter. Furthermore, these substitutes create a bland, rubbery texture instead of the velvety richness we crave. Philadelphia brand brick-style cream cheese consistently delivers excellent results in both flavor and texture. Remember, cheesecake isn’t health food—embrace the full-fat version for a truly satisfying dessert experience.
The role of sour cream and heavy cream
Sour cream adds a tangy element and crucial moisture that prevents your cheesecake from drying out in the oven. This ingredient works alongside cream cheese to create that perfect red velvet flavor profile. Similarly, heavy cream (also called heavy whipping cream) is essential for achieving a light, silky texture. Never substitute heavy cream with milk or half-and-half, as this will result in a runny filling. For best results, use cold heavy cream with at least 32% milk fat, and stick with full-fat sour cream rather than reduced-fat versions.
Why red gel food coloring matters
Traditional red velvet cake got its subtle reddish hue from the chemical reaction between unprocessed cocoa powder and acidic ingredients. Nevertheless, modern recipes typically use food coloring for that signature vibrant red. Gel food coloring provides intense color without watering down your batter, whereas liquid coloring might require tablespoons rather than drops. Indeed, some bakers prefer water-based food coloring since gel versions can sometimes leave a bitter aftertaste when used in larger quantities.
Cocoa powder and vinegar: the red velvet twist
Cocoa powder gives red velvet its subtle chocolate undertone—just enough to complement without overpowering the vanilla and tangy notes. Natural cocoa powder (not Dutch-processed) reacts with vinegar and buttermilk to create that distinctive “velvet” texture. The vinegar serves multiple purposes: it brightens the red color, enhances the tangy flavor, and helps create that uniquely tender crumb. This chemical reaction is what historically gave red velvet cake its natural reddish-brown color before food coloring became common.
Oreo crust: classic or flavored?
For the perfect Oreo crust, regular Oreos work best—avoid Double-Stuf varieties as the extra cream filling makes the crust too soft and greasy. You’ll need approximately 22 standard Oreos to yield 2 cups of crumbs, combined with 5 tablespoons of melted butter. Moreover, experiment with flavored Oreos like mint or peanut butter for unique variations. The cream filling in the cookies actually helps bind the crust together, so don’t remove it before crushing. Press the mixture firmly into your pan, paying special attention to the edges where the sides meet the bottom to ensure clean slices later.
Step-by-Step Baking Instructions (No Water Bath Needed)
Creating a flawless red velvet oreo cheesecake doesn’t require complicated techniques or water baths. By following these precise steps, you’ll achieve professional results every time.
Preparing the Oreo Crust
Begin by preheating your oven to 350°F (175°C). Place about 22-25 regular Oreos (with filling intact) in a food processor and pulse until they form fine crumbs. For the best texture, avoid Double-Stuf Oreos as they make the crust too greasy. Mix the crumbs with 5 tablespoons melted butter and 1/4 cup granulated sugar until they resemble wet sand. Press this mixture firmly into the bottom and 2/3 up the sides of a greased 9-inch springform pan, using a measuring cup for even compaction. Bake for 8-10 minutes, then cool while preparing the filling.
Mixing the Cheesecake Batter
Ensure all refrigerated ingredients reach room temperature before mixing. Beat cream cheese until completely smooth (4-5 minutes). Add sugar, sour cream, vanilla extract, heavy cream, cornstarch, and red gel food coloring, mixing on low speed until combined. Crack eggs into a separate bowl, whisk lightly, then incorporate slowly into the cream cheese mixture. Mix just until combined – overmixing introduces air bubbles that cause cracks. Gently tap the bowl against your counter to release trapped air.
Layering with Chopped Oreos
Pour half the cheesecake batter over the cooled crust. Sprinkle 1/2 cup chopped Oreos evenly across this layer, then cover with remaining batter. This creates delightful Oreo surprises throughout the cheesecake.
Baking Low and Slow
Place the cheesecake in a 300°F oven for 12 minutes. Without opening the door, reduce temperature to 225°F and continue baking for 110-115 minutes. This low, slow approach eliminates the need for a water bath while preventing cracks.
Cooling the Cheesecake Properly
Once baked, turn off the oven without opening the door, letting the cheesecake rest inside for 1 hour. Afterward, crack the oven door open with a wooden spoon for another hour. Finally, cool at room temperature for 2 hours before refrigerating for 3-4 hours or overnight. This gradual cooling process prevents temperature shocks that cause cracking.
Common Mistakes and How to Avoid Them
Even experienced bakers encounter challenges when creating the perfect red velvet oreo cheesecake. Understanding these common pitfalls can help you achieve professional results consistently.
Preventing cracks without a water bath
Despite popular belief, you don’t need a water bath for a flawless cheesecake. Place a pan of hot water on the oven’s bottom rack to create humidity. This prevents the top from drying out too quickly. Bake at low temperatures (around 225°F) and cool gradually—first with the oven off and door closed for about an hour, subsequently with the door slightly cracked. An insulated cake strip wrapped around your springform pan helps distribute heat evenly, preventing the edges from overcooking.
How to tell when your cheesecake is done
The jiggle test is truly the best method for determining doneness. Gently shake the pan—the outer 2-3 inches should look set while the center jiggles slightly. If it has a sloshy wiggle, it needs more time; if it’s just set and still jiggly, it’s ready. Alternatively, use a thermometer for absolute certainty—a properly baked cheesecake reaches 150°F internally. Never use the toothpick method as it can create cracks.
Avoiding overmixing and air bubbles
Overmixing is a leading cause of cracked cheesecakes. It incorporates excessive air, causing the cake to rise, collapse, and crack during cooling. Use room temperature ingredients to minimize mixing time. Beat cream cheese until smooth, but once eggs are added, mix only until the yolk disappears. After mixing, gently tap the bowl against your counter to release trapped air bubbles.
Fixing a cracked top with decoration
If cracks occur despite your best efforts, don’t panic! Chill your cheesecake thoroughly, consequently press the cracks closed with clean fingers. For stubborn cracks, dip an offset spatula in hot water and gently smooth over the gaps. Otherwise, strategic toppings work wonders—fresh whipped cream, fruit arrangements, or chocolate ganache can transform imperfections into intentional design elements.
Make-Ahead, Storage, and Serving Tips
Preparing your red velvet oreo cheesecake ahead of time offers both convenience and enhanced flavor development. With proper storage and presentation techniques, your masterpiece will taste just as amazing days later.
How to store in the fridge or freezer
This decadent red velvet oreo cheesecake stays fresh in the refrigerator for up to a week when stored properly. Initially, allow your cheesecake to cool completely at room temperature before refrigerating. Essentially, you have three storage options: wrap the entire cake in plastic wrap (use toothpicks to prevent toppings from getting smashed), place it in a cake carrier, or store individual slices in airtight containers.
For longer storage, freezing works wonderfully! Your cheesecake can be frozen for up to 3 months. First, chill it completely, then freeze until firm (about 3 hours). Wrap the cheesecake tightly in multiple layers of plastic wrap followed by foil. Prior to serving, thaw overnight in the refrigerator—never at room temperature for more than two hours.
When and how to add toppings
Always wait to add chocolate drizzle or whipped cream until you’re ready to serve. Even more importantly, toppings added before freezing may become soggy or discolored upon thawing. If your cheesecake developed cracks, strategic toppings can cleverly hide them.
Cutting clean slices every time
For picture-perfect slices, use the hot knife method:
- Chill your cheesecake thoroughly
- Fill a container with hot water deep enough for your knife blade
- Dip the knife, let it warm, then wipe dry
- Cut straight down with firm pressure—no sawing motion
- Clean and reheat the blade between each cut
Alternatively, unflavored dental floss creates remarkably clean cuts.
Serving suggestions and presentation ideas
Coupled with its striking red color, this cheesecake needs minimal decoration. Yet a drizzle of warm Nutella, chocolate ganache, or a dollop of whipped cream enhances both flavor and presentation. Serve alongside fresh berries or a sprinkle of crushed Oreos for extra visual appeal. Above all, ensure your cheesecake reaches the perfect temperature—cool but not cold—to maximize flavor.
Conclusion
Red velvet oreo cheesecake truly stands as a masterpiece dessert that combines stunning visuals with incredible flavor. Throughout this guide, we’ve explored everything from selecting the right ingredients to troubleshooting common problems. This show-stopping dessert might seem intimidating at first glance, but as you’ve seen, the process breaks down into manageable steps anyone can follow.
The beauty of this recipe lies not only in its gorgeous red color and decadent taste but also in its practicality. Unlike many elaborate desserts, this cheesecake doesn’t require specialized equipment or a water bath. Additionally, the make-ahead option makes it perfect for busy schedules or special occasions.
Cost-effectiveness certainly adds another compelling reason to try this recipe. For roughly $7.45, you can create a dessert that serves eight people and surpasses store-bought alternatives in both quality and presentation. The ability to customize your cheesecake with different Oreo varieties or toppings allows endless creativity.
Remember those key techniques we covered – room temperature ingredients, gentle mixing after adding eggs, and gradual cooling – these small details make the difference between good and exceptional results. Undoubtedly, even if cracks appear, you now know several clever fixes to ensure your cheesecake looks flawless.
Whether you prepare this treat for a holiday gathering, birthday celebration, or simply to indulge yourself, this red velvet oreo cheesecake promises to impress. The vibrant color contrasted against the dark Oreo crust creates a visual impact before anyone takes their first bite.
Give this recipe a try! After all, few desserts offer such remarkable results with relatively straightforward preparation. Soon you’ll discover why this red velvet oreo cheesecake deserves a permanent place in your baking repertoire.
FAQs
Q1. How long can I store red velvet Oreo cheesecake? You can store the cheesecake in the refrigerator for up to a week when properly wrapped. For longer storage, you can freeze it for up to 3 months. Just make sure to thaw it overnight in the refrigerator before serving.
Q2. Do I need a water bath to bake this cheesecake? No, a water bath isn’t necessary for this recipe. Instead, you can place a pan of hot water on the bottom rack of the oven to create humidity, which helps prevent cracking. Baking at a low temperature and cooling gradually also contribute to a perfect cheesecake without a water bath.
Q3. What’s the best way to achieve clean slices when cutting the cheesecake? For clean slices, use the hot knife method. Chill the cheesecake thoroughly, then dip a sharp knife in hot water, wipe it dry, and make a clean cut. Clean and reheat the blade between each slice. Alternatively, unflavored dental floss can also create remarkably clean cuts.
Q4. Can I use low-fat cream cheese for this recipe? It’s best to use full-fat cream cheese for the best texture and flavor. Low-fat varieties can lead to a runny, unstable batter and result in a bland, rubbery texture instead of the desired velvety richness.
Q5. How can I tell when the cheesecake is done baking? The best method is the jiggle test. Gently shake the pan – the outer 2-3 inches should look set while the center jiggles slightly. If it has a sloshy wiggle, it needs more time. For absolute certainty, you can use a thermometer; a properly baked cheesecake reaches 150°F internally.