
The Perfect Tuna Melt Sandwich Recipe (Tested 23 Times)

A good tuna melt sandwich recipe ranks high on my list of favorite comfort foods. There’s something undeniably satisfying about a warm, toasty sandwich with creamy tuna mixture and melted cheese that literally melts in your mouth. After testing this classic tuna melt recipe 23 times, I’ve perfected every element of this budget-friendly meal that comes together in less than 20 minutes.
For those watching their nutrition, each serving provides 484 calories with 35g of protein, making it a filling option for lunch or a light dinner. The perfect tuna melt is essentially the pinnacle of comfort food – ideal for shaking up your routine or as an easy late-night meal. Throughout this guide, I’ll share exactly how to make a tuna melt that achieves that golden, crispy exterior while maintaining the ideal balance of flavors inside. Additionally, I’ll cover the best cheese for tuna melt sandwiches, common mistakes to avoid, and creative variations to keep this classic sandwich exciting every time you make it.
Choosing the Right Ingredients for a Perfect Tuna Melt
The secret to a perfect tuna melt sandwich recipe lies in selecting quality ingredients that work harmoniously together. My testing has revealed that each component plays a crucial role in creating that ideal balance of flavors and textures.
Best tuna for tuna melt sandwiches
When crafting the perfect tuna melt, your choice of tuna makes a significant difference. Americans consume over 1 billion pounds of canned tuna yearly, but not all varieties create equal results. Oil-packed tuna consistently outperforms water-packed options for sandwiches. Specifically, tuna packed in olive oil delivers a richer, more luxurious texture and flavor, as the oil helps lock in moisture. For the best results, look for imported tuna from Spain packed in olive oil – a preference shared by culinary experts like Ina Garten. Between chunk and solid styles, both work well, though solid allows more control over the final texture.
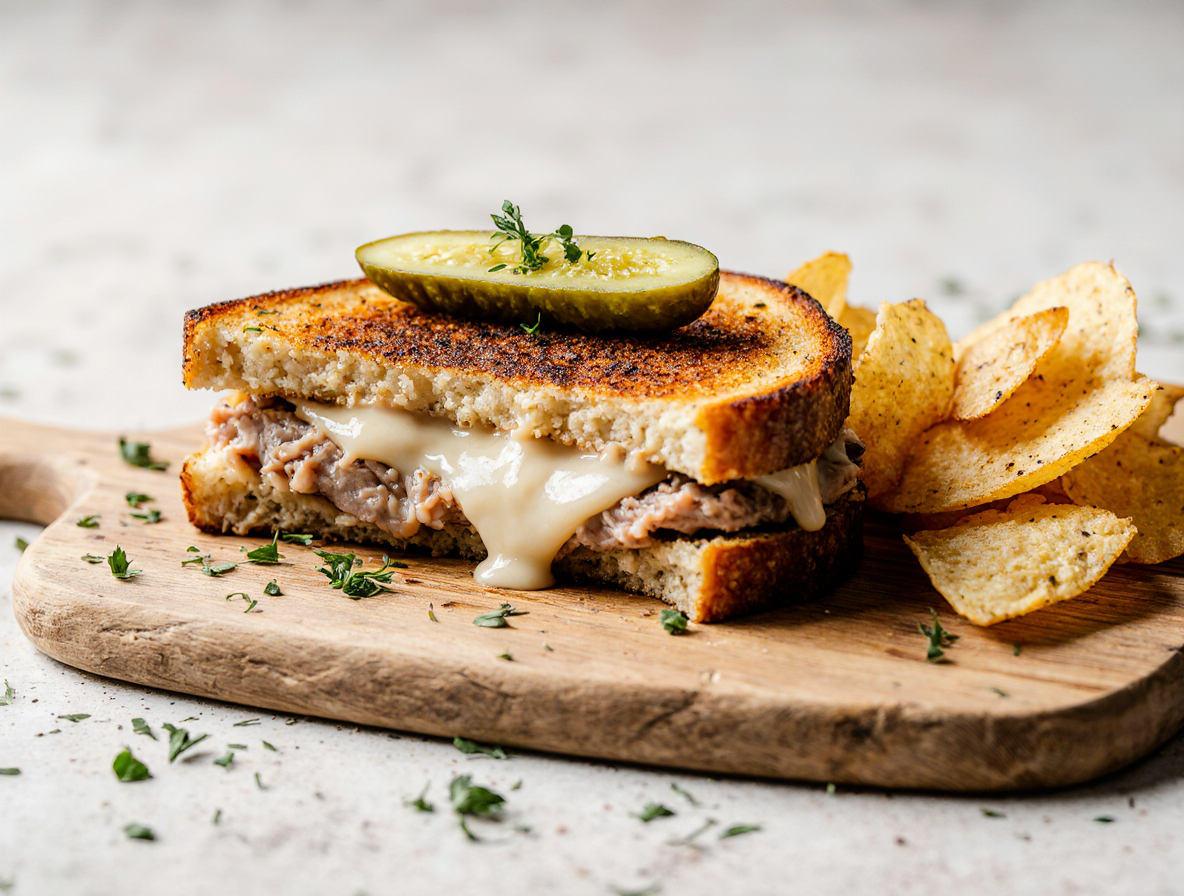
Best cheese for tuna melt: melty and flavorful options
The cheese in a tuna melt serves dual purposes – delivering flavor and functioning as culinary glue that holds everything together. American cheese offers superior meltability, though sharp cheddar provides a more distinctive taste. Other excellent options include fontina and havarti, which melt beautifully for a gooey, creamy texture. Swiss, Gruyère, Gouda, and mozzarella also work wonderfully, each bringing their unique flavor profiles. Firstly, consider the meltability of your cheese – younger cheddars melt better than aged varieties, which can become grainy when heated.
Bread types that hold up and toast well
Selecting the right bread is equally important as your cheese and tuna choices. Sourdough emerges as the top choice for a tuna melt, offering sturdiness, a tangy flavor that complements rich fillings, and excellent toasting properties. Brioche makes an outstanding alternative with its buttery flavor, though it browns more quickly than other options. Rye bread adds a distinctive flavor that pairs beautifully with tuna, especially when using caraway-spiked varieties. Above all, look for bread with a tight crumb structure – approximately 1/4 inch thick – to ensure it crisps nicely without absorbing too much butter.
Crunchy and creamy add-ins: celery, onion, pickles
A truly outstanding tuna melt needs textural contrast. Red onion delivers a triple benefit – adding crunch, flavor, and vibrant color. Celery contributes a fresh crunch that counters the soft tuna and melty cheese perfectly. Moreover, adding pickles or capers introduces a briny element that provides necessary acidity and salt. For additional crunch, consider water chestnuts or fennel, which maintain their texture even when mixed with mayonnaise. Ultimately, these add-ins aren’t just about texture – they help balance the rich, creamy elements with brightness and acidity for a perfectly harmonious sandwich.
How to Make a Tuna Melt Step-by-Step
Now that we’ve gathered our ingredients, let’s dive into the actual process of creating the perfect tuna melt sandwich recipe. After multiple tests, I’ve perfected each step to ensure consistent results every time.
Mixing the tuna salad base
Begin by breaking up the tuna in a mixing bowl using a fork until it reaches your desired texture. Subsequently, add 1/4 to 1/3 cup of mayonnaise and 1 tablespoon of whole grain mustard. Next, incorporate your crunchy elements—finely chopped celery, red onion (preferably soaked in cold water for 5 minutes to reduce sharpness), and dill pickles. For brightness, a squeeze of fresh lemon juice makes all the difference. Finally, season with black pepper and herbs like parsley, dill, or tarragon according to your preference.
Layering cheese, tuna, and tomato
For a successful tuna melt, the layering order matters tremendously. Rather than randomly stacking ingredients, place a slice of cheese directly on the bread first—this creates a moisture barrier that prevents sogginess. Then, spread your tuna mixture evenly, going all the way to the edges. If using tomato slices, place them next, followed by another slice of cheese on top. This “cheese sandwich” approach ensures everything stays together during cooking.
Skillet method: golden and crispy
The skillet method produces a wonderfully crispy exterior. Start by heating a large cast-iron skillet over medium-low heat. Meanwhile, spread butter (or mayonnaise) on the outside of your sandwich bread. Place the sandwich cheese-side down first—this ensures the cheese melts properly. Cook for approximately 3-4 minutes until golden brown, then carefully flip and cook the other side for another 3-4 minutes. Pressing down gently with a spatula creates better contact with the pan for even browning.
Broiler method: fast and melty
For a quicker approach, the broiler works beautifully. Position your oven rack 4-6 inches from the heat source and preheat the broiler. Toast bread slices first, then spread with mayonnaise if desired. Top with tuna mixture, followed by cheese. Broil for 3-5 minutes until the cheese bubbles and begins to brown. Remember to watch carefully as broilers can quickly turn from perfect to burnt in seconds!
Tips to Elevate Your Tuna Melt Game
After testing tuna melt recipes extensively, I’ve discovered some game-changing techniques that transform an ordinary sandwich into something extraordinary. These practical tips will help you avoid common pitfalls and create the perfect tuna melt sandwich recipe every time.
How to avoid soggy bread
The nemesis of any good tuna melt is sogginess. Consequently, use thick-sliced hearty bread such as crusty French bread, sourdough, or English muffins whose nooks and crannies help absorb excess moisture. Prior to assembling, toast the bread to create a moisture barrier. Furthermore, drain your tuna thoroughly, squeezing out every drop of water. In fact, adding bread crumbs to your tuna mixture helps absorb excess liquid while creating a creamier texture.
Getting the cheese perfectly melted
For cheese that’s melty and delicious, select varieties known for meltability. Interestingly, American cheese melts beautifully due to its lower melting point and emulsifying agents, though cheddar offers better flavor. When cooking, keep heat at medium-low and cover the skillet with a lid—the trapped heat ensures even melting. Besides, pressing down gently with a spatula creates better contact with the pan for uniform browning and melting.
Balancing flavors with acidity and herbs
The best tuna melts balance rich, creamy elements with brightness. Notably, fresh herbs like dill, chives, tarragon, or parsley add dimension. A squeeze of lemon juice or vinegar cuts through richness, while pickles or capers introduce necessary brininess. Additionally, consider adding Dijon mustard, quick-pickled onions, or even curry powder to elevate flavors. This balance prevents the sandwich from feeling heavy or one-dimensional.
Common mistakes to avoid
Several errors can derail your tuna melt. Overall, cooking at too high heat burns bread before cheese melts properly. Never skip pre-toasting, which provides crucial structural integrity. Another mistake is insufficient draining—watery tuna creates soggy results. In contrast to popular belief, allowing tuna salad to “marinate” in the refrigerator for a few hours improves flavor as ingredients meld together. Remember to taste and adjust seasonings before assembling your perfect tuna melt.
Tuna Melt Variations and Storage Ideas
The versatility of the tuna melt sandwich recipe extends far beyond the classic version. After perfecting the basic technique, exploring different variations can keep this simple meal exciting for years to come.
Low-carb and open-faced options
For those watching their carbohydrate intake, several delicious alternatives exist. Bell pepper halves make excellent vessels for tuna mixture and cheese, creating a colorful, crunchy base with zero carbs. Alternatively, hollowed-out tomatoes serve as antioxidant-rich containers that complement the savory tuna perfectly. For an open-faced approach, serving tuna melts on a single slice of bread allows for more generous portions of tuna and cheese while cutting down on carbohydrates. This presentation style emphasizes the filling rather than the bread, creating a more substantial tuna taste.
Creative cheese and topping swaps
Experimenting with different cheeses transforms the flavor profile of your tuna melt. Beyond cheddar, consider:
- Gouda for subtle sweetness
- Havarti for buttery richness
- Pepper jack for spicy kick
Exciting variations include the “Spicy Pepper Jack” with minced jalapeños, “Bacon Swiss” with crispy bacon, or “Pineapple Green Onion” with thin pineapple slices instead of tomatoes. Some enthusiasts even add mashed avocado, chopped pickles, or capers for extra dimension.
How to store tuna salad and assembled melts
Properly stored tuna salad stays fresh in an airtight container for 3-5 days in the refrigerator. For meal prep convenience, consider making a double batch of tuna mixture to enjoy throughout the week. Concerning assembled sandwiches, they’re best enjoyed immediately, as bread tends to become soggy during storage. However, if needed, wrapped tuna melts can be refrigerated for 1-2 days.
Reheating tips for best texture
To rejuvenate leftover tuna melts, several methods yield excellent results. For oven reheating, preheat to 350°F and warm for approximately 10 minutes. The skillet method works wonderfully too—place the sandwich in a dry pan over medium heat for 2-3 minutes per side, possibly covering to distribute heat evenly. For modern convenience, air fryers effectively restore crispness to the bread while properly melting the cheese.
Conclusion
Perfecting the tuna melt sandwich might seem simple, yet mastering each element truly elevates this classic comfort food. Throughout my 23 test runs, one fact became abundantly clear – quality ingredients combined with proper technique create sandwich magic every time. The right tuna (preferably oil-packed), perfectly melty cheese, sturdy bread, and crunchy add-ins work together harmoniously to deliver that ideal bite.
Your cooking method choice ultimately depends on your preference and available time. The skillet method delivers unmatched crispiness, while the broiler option provides speed without sacrificing that golden cheese finish. Above all, remember that preventing soggy bread stands as your primary challenge – pre-toasting bread and properly draining tuna make all the difference.
This humble sandwich certainly deserves its place among beloved comfort foods. Packed with 35g of protein per serving and ready in under 20 minutes, it offers both nutrition and convenience without breaking your budget. Additionally, the endless variation possibilities ensure you’ll never grow tired of this versatile meal.
Whether you stick with the classic recipe or venture into creative territory with different cheeses and add-ins, the perfect tuna melt awaits your personal touch. The next time comfort food cravings strike, reach for these tested techniques and quality ingredients – your taste buds will undoubtedly thank you!
FAQs
Q1. What are the key ingredients for a perfect tuna melt? A perfect tuna melt combines quality tuna (preferably oil-packed), melty cheese like cheddar or American, sturdy bread like sourdough, and crunchy add-ins such as celery and onions. Mayo adds creaminess, while a slice of tomato provides freshness.
Q2. How can I prevent my tuna melt from becoming soggy? To avoid soggy bread, use thick-sliced hearty bread and pre-toast it before assembling. Drain the tuna thoroughly and consider adding breadcrumbs to the tuna mixture to absorb excess moisture. Placing cheese directly on the bread also creates a moisture barrier.
Q3. What’s the best method for melting the cheese in a tuna melt? For perfectly melted cheese, cook the sandwich over medium-low heat in a skillet. Cover with a lid to trap heat for even melting. Gently press down with a spatula to ensure good contact with the pan. Alternatively, use the broiler method for quick, bubbly cheese.
Q4. How can I elevate the flavor of my tuna melt? Enhance your tuna melt by adding fresh herbs like dill or parsley, a squeeze of lemon juice for brightness, and pickles or capers for brininess. Experiment with different cheeses like Gouda or Havarti, and consider add-ins like bacon or avocado for extra flavor dimensions.
Q5. What are some good side dishes to serve with tuna melts? Tuna melts pair well with a variety of sides. Classic options include potato chips, coleslaw, or a simple side salad. For a heartier meal, try french fries or onion rings. A cup of tomato soup makes for a comforting combination, especially on colder days.